Build Thread Custom Jeep CJ Truck Build

Build Thread Custom Jeep CJ Truck Build
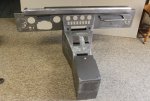
Rained again today. :( So I went back to Double D's web page and looked at the custom dashes he has. Found one I really like. Not sure if I want to keep the "Punisher" emblems or not. Also this one is for a YJ, so I would remove a couple of things and add a couple of things. But you get the idea.
Custom%20Dash_zpstxgg3j1r.jpg

It would work really great with the cable shifters I plan to use. The automatic transmission will be a Winter's Performance shifter, and the transfer case will be a JB Fab Double shifter. If I kept the "Punisher" emblems, I'd have to figure out how to paint them like this:

Punsher%20Thin%20Blue%20Line_zpsjbvejw2p.jpg

The console part would work great for some of the radios I plan to put in my truck. I would most likely delete the glove box since I have the console storage and add a slot for another radio there. Right now I have an AM/FM radio to put in, a CB, a Ham Duel Band, an Astro Spectra, and a scanner. I'm also considering a mobile HF radio too. :eek: So I need the space. I have my eye on a custom A/C heater unit that will take up less space than the OEM unit. That will free up space behind the dash too. :D
 
:eek: now thats a sweet dash Im not huge on the Punisher logo fad but it would look sweet with the colors. have some correctly sized stickers made and cut out the holes with a razor blade maybe? :chug:
 
:eek: now thats a sweet dash

Yes it is. With a full on custom CJ Truck, you gotta have something custom inside! You can have any logo you want cut into the dash. :) Those actually act as the speaker cutouts if you want. ;) For those that don't know, the "Punisher" was a comic book character. It was a Police Officer that turned vigilantly. :eek: He used that symbol on the chest of his costume. It is a modern day police symbol with the thin blue line. "Punisher"
 
Last edited:
Geeeeeeze, what hasn't happened lately. Had to take care of the grandkids a bunch right off the bat. Teachers had to spend a week at school before the kids came back. My daughter is a high school physics teacher. Then after the first week of school, I got a bad cold, and then got the flu. I hope that does it for the rest of the year!

Anyway a couple of things happened. The rear LED hamburger lights I bought, one of them was cracked when I took it out of the box. No big deal, I got it through Amazon. So my reply was they would refund 1/4 of the money. I explained that I needed 4 lights. Were they going to have some more? They couldn't say, but they would refund me half of my money. So Okay. Looked around for a replacement light. That was a no-go! Found some in Great Britain for an arm and a leg. :dung:! :bang: So the heck with it, I bought some 6" oval LEDs. Plenty of them around. So two red for the side mount and two white at the bottom ends for backup lights. I will most likely get two more red and a couple of amber for the headache rack I plan to build.

I also bought a couple of Eagle Eye LEDs. They are about an inch in diameter with 4 LEDs in them. Two amber and two white. They will go in the hole from the cruel at the top of the bed on both sides. Backup and turn signals. Should be cool looking.

I also got my extra Transfer Case (Quadratrac) back in the mail that I sent to JB Fab. No explanation. I tried to call a couple of times and left messages, but nothing. Then I got an email that they weren't interested in it. Also said I didn't send the information they needed on measurements, etc. So I referred Jon to the email he just sent that had my response at the bottom with all the measurements. I told him I even sent pictures to help. The reply was I could get a $50 discount on any purchase I make from them. What a bummer. I still plan to buy a couple of his shifters, I'll just have to make all of the brackets and the shift rod myself.

Here is a few pictures of what I came up with the other day when I had a little time.

This is the top where the diaphragm shifts the TC:
WP_20160918_008_zpsvxw5kbbn.jpg

Here is a piece of metal I dug up to use:
WP_20160918_004_zps7h4qqa82.jpg

Here are a couple of pictures of the bracket I made to start with:
WP_20160918_005_zpsxcg7gkpy.jpg

WP_20160918_006_zps17wdgoob.jpg

It attaches to the access cover. The cable would attach to the end of the bracket, which will attach to the shifter rod. Here is the rod with a rough piece added on to it to make it long enough for a cable attachment.

WP_20160918_007_zpszqpkp8mr.jpg

This is the rod that attaches to the diaphragm that is vacuum controlled. My plan is to replace it with the cable shifter. Wish I had a metal lathe about now. So some more work to be done another day on this. I will also need to make a bracket and an attachment for a cable to the low range unit too.

If anybody has any better ideas, shoot them my way as this is unmarked territory for sure. :chug:
 
Raining here yesterday and today. Looks like cooler temperatures next week! :D Got a chance to work on the transfer case. I ground down the excess weld on the rod that is attached to the diaphragm. This rod moves in and out to engage the differential or in my case part time to full time. Here is a picture showing this rod sticking out of the transfer case.

WP_20160925_004_zpsdca9p1h9.jpg

Here is a picture showing the rod in relation to the bracket I made. The bracket will have the cable attached to it.
WP_20160925_005_zpszig7ym9i.jpg

Just to give you an idea of how much movement there is to engage and disengage the transfer case, look at the next two pictures and the position of the shifting fork.

WP_20160925_002_zpsw24hbvyp.jpg

WP_20160925_003_zps7tvyouno.jpg

So this will be a very short throw shifter. The detents on the rod lock up through the use of a small ball bearing and a spring that locks it into the two positions. The added ground switch at the end of the shifter rod will make the movement more precise, as it's ball bearing is very stiff.

Hopefully more in a couple of days.
 
I just read the build up to this point. Cool idea and nice work!
 
Thanks, that means a lot to me, as I have never attempted anything like this before. It's one thing to rebuild your Jeep by replacing parts, new paint, etc, but this is a whole different cup of tea. It's going to really put my skills (if I have any) to the test.
 
It's going to really put my skills (if I have any) to the test.

LOL -He said "if I have any (skills)". HAHAHAHAHAHAHAHAHAHAHAHAHA

I hate to tell you this, but - skills you have, sir. Your thread proves it :chug:
 
LOL -He said "if I have any (skills)". HAHAHAHAHAHAHAHAHAHAHAHAHA

I hate to tell you this, but - skills you have, sir. Your thread proves it :chug:

Thank you for the kind comment. This is all new territory for me, but I'm having fun learning as I go. I guess the real answer to this will be does it all work when I'm done, and will it be what I wanted to drive. I sure hope so.

When I was much younger I bought a new 76 CJ5. It was orange with a white top and white seats, no options. Didn't even come with a radio. I loved that Jeep, had a lot of fun with it, and wish I had never gotten rid of it. I've also had a Jeep Cherokee. It was a great ride. I did a few upgrades with it, but nothing like what I'm doing now. Sold it when we left Colorado. Currently I'm driving my son-in-law's YJ. Even though it's a YJ, I enjoy driving it. Keeps me going on my project because I can't wait to drive mine. So the jest of all of this, I hope it all works out, and I really appreciate the confidence and comments you guys post. Thanks again. :chug:
 
With any project there may be "bugs" to work out, and that's normal. The restoration TV shows don't usually show that part as we all already know. Rest assured that once this project is done, if it turns out its not your cup of tea you should easily be able to sell it, sit back a minute and maybe decide to go back to that "ole" CJ5 or something. This looks to be a One off of sorts.. CUSTOM for sure, you'll get your money back out of it along with the experience. Keep it going, it's looking good!
 
So Friday was a really bad pain day and Saturday wasn't much better. But today I got a chance to do a little work out in the garage. I decided to look at the specs for the cables. Holly cow :eek: it is 7" from the attachment point to the end of the cable. Guess I better rethink my brackets. So first problem was I needed a 2" 3/8" bolt, but it needed to be all threads. Didn't want to run to town just for one bolt that they may not have, so out came the tap and die set.

After adding more threads here is what I got.
WP_20161002_003_zpst4cscyjd.jpg

This is all the farther a regular bolt would go in:
WP_20161002_004_zpsi4dtboe8.jpg

After adding threads I was able to run it all the way through.
WP_20161002_005_zpslatfgjyr.jpg

So I made a couple of brackets and painted them.
WP_20161002_002_zpsaqymjxjh.jpg

This is the bracket I made for the low range unit. It is attached to the TC in three different places for strength.
WP_20161002_006_zpsypw0i8r5.jpg

This is the bracket I made for the replacement of the diaphragm. The first attempt turned out to be to short, so I added on to it. None of these look like the CNC brackets that come with most shifters, but what the hey.
WP_20161002_008_zpsnuyupa6d.jpg

WP_20161002_009_zpsaknfdbrz.jpg

I was wondering what other with quadratracs did for the low range shifter. I'll have to ask that question. Little progress today, more to follow.
 
NICE!!


Sent from my iPhone using Tapatalk
 
So glad that somebody's getting some progress done here... With how things are going for me lately, it'll probably be December before I get to even go out in the garage again, much less think about getting some Jeep work done. Keep it up! I've got to live vicariously through somebody! :chug:
 
Yes Sir! Actually life gets in the way for all of us. It is a part of a rebuild that is never shown on the TV shows. Heck, I could do a complete rebuild of a Jeep in a week with 7 experienced guys and unlimited funds, but that's just not reality for us. I try to work on some of the little things during those times when I might only have a half hour. So, right now I already have my wiring harness rebuilt, my steering column refurbished, etc. If nothing else take a few minutes and jot down on paper what all needs to be done, and what you want to do first. These little things help you feel like your still making progress but take very little time to do. Hang in there, we'll soon be reading more about your build.
 
So I made a lucky find this last week that really made my weekend. A couple of nights ago I was surfing CL for Jeep Parts. (do this a lot, but rarely find anything) Just by chance, I did a search on Jeep Scrambler. Low and Behold, I found a CJ8 Hardtop. These are really rare down here. I found one guy with two awhile back, but he want $800 and $1000 for them. :eek: So this one was in Austin (about 2 1/2 hour drive). The guy only want $350. The wife and I drove up there and picked it up. I hauled it home in my Jeep trailer. ;) Pressure washed it as soon as I got home, but you can tell it sat outside in the yard for awhile. No problem! I plan to plug the seatbelt holes, line it with some Lizard Skin, and repaint the top white. Here in South Central Texas the lining will help with the summer heat. I would also like a window slider but may have to have a local glass company just cut me a piece to put in. Either way not a big deal. Here are some pictures of it as soon as I got home.

WP_20161015_005_zpsc7n7ykmv.jpg

WP_20161015_004_zps8p7vmoks.jpg

WP_20161015_003_zpscdmf9gmq.jpg

So I feel like this was another big step toward my Custom CJ Truck. :notworthy:
 
Last edited:
Nice score!!


Sent from my iPhone using Tapatalk
 
Good grab. :chug: that's a late '82 and up top. The holes were where the over the shoulder seat belts mounted to the roll bar as opposed to the earlier style lap belt only models. Not only will the white top be a little cooler , it'll look good with the blue. Gr8 tops sells a slider window

CJ-8 Half hardtop replacement slider window – GR8TOPS

Yep, knew about GR8TOP. That's what I want to try to do. Pete, you say it is an 82 and up. GR8TOP divides them into two categories based on the curve of the window corners. (see the pics under the window) Type A is 81 - 83 and Type B is 83 1/2 - 86. According to that mine is a Type A. So if you put those two together it can only be an 82 or 83. Does anybody know if that is right? Thanks.

By the way, I'm considering painting it Dark Green instead of Blue. Blue is OEM, but Green is my favorite. Of course very little is OEM on this thing. Any comments?

PS: I'd have to paint my trailer again too.
 
From what I've read the window change was a couple months into '83. By '83 all of them had shoulder belts. My '82 had lap belts but Ive seen other '82s with shoulder belts. I know guys who've drilled the holes in earlier tops as well. I'm not sure if the window configuration and the seat belt holes were synonymous or not.
 
What a great find. :dbanana:
Now, go buy a lotto ticket. :D
LG
 

Jeep-CJ Donation Drive

Help support Jeep-CJ.com by making a donation.

Help support Jeep-CJ.com by making a donation.
Goal
$200.00
Earned
$10.00
This donation drive ends in
Back
Top Bottom