Build Thread '76 CJ5 351w Swap

Build Thread '76 CJ5 351w Swap
No pictures right now, but I made some serious progress since my last post.

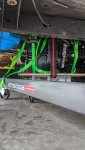
Wiring is complete...everything that can live in a wire loom is tucked away as best as possible...not the easiest with all the connectors for the Sniper. Last connection is the reverse switch on the T18.

Fuel lines are routed with fuel filter. Fuel tank is installed...biggest PITA.

I broke down and ordered custom color Daily Driver seats and a new bench from PRP. Should get those in a few weeks.

What's left:
-replace adapter plate on T18/Dana 20 with correct one
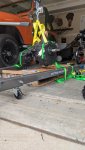
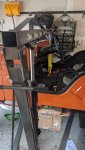
-install T18/Dana 20
-measure for new driveshafts; order and install
-install exhaust
-install seats when they arrive
-add fluids
-fill fuel tank
-say a little prayer to the Jeep gods
-turn key
-rop rop rop rop rop rop rop rop rop rop rop....vrrrroooooom
-break-in procedure for 351w
-drink a beer and take a nap
 
you need to a smoke a cigar with the beer. sounds like you deserve it.
 
It's been another productive weekend...

The correct adapter plate for the T18/Dana 20 showed up a while back and I finally got to working on it. I have no real bench space to work on, so I had to improvise with the engine lift and transmission jack.

I've never done anything like this before, but it was pretty straightforward. Take the bolts off to remove the TC, remove the retaining nut (1-5/16") and gear, remove bolts for the adapter plate. Reverse order for putting it back in. New gaskets and a little locktite for the nut, and I was good to go.

Today's adventure was installing the transmission and transfer case. Again, this was the first time I've done this, and I'm sure there are better ways, but in the end I got it done.

I put the whole assembly on the garage floor on a piece of cardboard so I could slide it underneath the CJ. Jacked up the front end for clearance and slid it under. I strapped the hell out of it and lifted it through the trans cover with the engine hoist. After trying to muscle it in from underneath like that, I figured it would bake life easier by attaching the skid plate to it to get a little more leverage. After a few more attempts, I put the transmission jack under it and used another floor jack on the passenger side to help get the correct angle. After I got it all straight and lined up, I got it pushed in, but I struggled with the last little bit since the splines weren't line up with the clutch disc. I rotated the crank from the balancer a little bit at a time and finally got it to go in.

I used some 3.5" bolts to start with to help keep the whole thing lined up while I pushed the transmission in.

Between getting some stuff done around the house and taking care of the kids, it took me about 6 hours to do...by myself. Not sure I'll ever attempt something like that on my own again. Time for some NSAIDs.
 

Attachments

  • PXL_20201003_145244886.jpg
    PXL_20201003_145244886.jpg
    130.1 KB · Views: 18
  • PXL_20201003_145252239.jpg
    PXL_20201003_145252239.jpg
    128.4 KB · Views: 15
  • PXL_20201003_202730396.jpg
    PXL_20201003_202730396.jpg
    146.6 KB · Views: 16
  • PXL_20201004_161300645.jpg
    PXL_20201004_161300645.jpg
    153.5 KB · Views: 14
  • PXL_20201004_165408829.jpg
    PXL_20201004_165408829.jpg
    154.7 KB · Views: 19
  • PXL_20201004_183149752.jpg
    PXL_20201004_183149752.jpg
    134.5 KB · Views: 17
  • PXL_20201004_183202241.jpg
    PXL_20201004_183202241.jpg
    142.3 KB · Views: 15
  • PXL_20201004_230821561.jpg
    PXL_20201004_230821561.jpg
    220.1 KB · Views: 16
  • PXL_20201004_230839455.jpg
    PXL_20201004_230839455.jpg
    122 KB · Views: 19
  • PXL_20201004_230901756.jpg
    PXL_20201004_230901756.jpg
    159.1 KB · Views: 15
Yea I like to keep the Advil around myself Good job !
 
Your build is looking awesome and happy to hear your health has allowed you to get back at it. My engine should be back from he machine shop next week and I'll be trying to get to where you are in the build. Exciting times...
 
Spent some more time with the CJ today. While I wait for the exhaust shop to fit me in...next Tuesday...I decided to tackle the twin stick kit from JB. It's a very well built kit and install was a breeze.

Only hitch with my setup was the mounting tube on the Dana 20. It wasn't long enough. It didn't give me enough room for the mounting tab and heim joint for each stick that comes with the kit. Not that big of a deal...I made a quick run to the local hardware store and picked up a 2' piece of 3/4" ID gas pipe. The OD of the tube needed to be 1-1/4", and the OD of the gas pipe was a hair shy. Got it home, cut it to length, drilled the set screw holes where they needed to be, and I was back in business.

I'm impressed with the whole setup with one exception...to secure the heim joint to the bottom of each stick, you have to cut your own all-thread and use a nut on each side. I'm assuming that's a cost cutting decision instead of supplying a nut and bolt for each stick. He gives you a ton of all-thread in the kit.

One additional modification was that I had to cut out part of the side of the trans tunnel to make room for the new setup. Just a small price to pay for the twin stick setup. I'll need to make the trans cover a bit bigger and put a bend in it to make it fit correctly.

Next I have to tackle getting the T18 shifter bent to shape. It'll need a double bend because it's home is behind the plane of the dash. I'll probably call the local machine shop after I mock something out of cardboard or hangar wire. ef27a0f5cfe3016c3853d5aed3f186aa.jpgfee92d902aea2962b736262d93d2c706.jpg

Sent from my Pixel 2 using Tapatalk
 
I had the same issue, a PO had hacked the tunnel up somewhat getting the trans and TC in. Once I twin sticked it moved the sticks over a bit towards the trans. I decided it was time for a new cover. Had a piece of AL diamond plate lying around, made template and went to town on it with rubber hammer and Saber saw. A local trans shop had a shift cane lying around in the back room which worked out just right. I tried to get the cover to match the outline of tunnel as much as possible, had to go wider around the twin sticks to cover a missing piece of tunnel.
 

Attachments

  • 20201009_145021.jpg
    20201009_145021.jpg
    151.1 KB · Views: 19
After a year and a half, today was the moment of truth!

Topped off all fluids...break-in oil, coolant, PS fluid, trans and TC fluid, bled the hydraulic clutch.

Checked wiring...blew the headlight circuit so I need to come back to that one. Hoping it's just the :dung: 
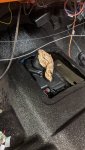
OMIX switch that I installed. Everything else passed muster.

Put the key in the ignition and switched it to run to fire up the Sniper. Everything turned on as it should. Went through the initial setup to enter my settings. Cycled the power to reset the Sniper so it would reboot correctly with my new settings.

Fuel pump turned on. 60psi. Check.

All readings on the touchscreen read as they should.

Heard fluid dripping from under the hood...fuel leak at my pressure gauge connection. :dung: it down, tightened it up and turned the key back on to run to get the fuel pump going again. Leak stopped. Checked inline fuel filter connections for leaks...good to go.

Turned the key to crank and...not enough power to the starter. It tried with a pitiful attempt. What was I missing? Checked all my connections and checked the battery. Everything was good. Then it dawned on me...I forgot to run ground cables from the battery to the frame and engine.

Ok. Grand cables installed. Back in the cockpit...that's what I'm calling it because I have no seats in it right now. Turn key to run. Gauges, check. Fuel pump, check. Sniper dashboard, check. Turn the ignition to start, and BAM! Fires up instantly and scares the living :dung: out of me.

Idles perfectly. AFR finds its sweet spot after it warms up. I have a 195 degree thermostat in it and the temp settles in right on the money. I rev it up and get the temp up to engage both electric fans. Test SAT. Neighbor comes over to say that was the best sound he'd heard all year and got me a beer.

Engine cut off a few second later. Turns out I had another fuel leak at the tank and pressure dropped enough to shut it down.

That was enough for today. I'll drop the tank tomorrow and tighten things up at the tank and start chasing the issue with the headlight circuit.

One thing is for sure, the exhaust is LOUD. I'm already thinking about taking out the Summit glass pack and putting in something quieter.

Also a lot of exhaust leaking at the collector flanges on the headers. The exhaust is the only thing I didn't do myself, so I'll give the shop a call and tell them they can handle those for me.

All in all a great day. I've been stressed out the last couple weeks thinking I probably screwed something up so bad that I'd have to tear it all back down and start from scratch. A few minor hitches, but nothing serious.

I didn't get a chance to take video because the fuel leak in back happened fairly quickly. I shut it down for the night after wiping up the excess fuel.

Such a relief!

Sent from my Pixel 2 using Tapatalk
 
Glad for you. Great news !
 
Awesome!!! Wish I was there to watch and hear it run. There are always a few glitches along the way but yours seem minor ad i'm sure you'll get them figured out.
Looking forward to reading more!!
 
Headlight circuit: switch is good, found a short in the front passenger parking lamp. I accidentally spliced a hot wire from the lamp to ground. Fixed that issue and everything else works perfectly.

Fuel leak: fuel was sleeping out of the output fitting on top of the in-tank fuel pump. Forgot to seal it with fuel safe thread sealer. Put some on this morning and I'll let it sit overnight to cure.

Exhaust smoke: I think it's just the gaskets and paint burning. Once the thread sealant cures on the fuel fitting, I'll fire it back up and let it run longer and see if it slows down and stops. It never actually sounded like an exhaust leak, so hopefully it's not an issue.

I'm just relieved that I don't have to spend hours chasing wires.

Sent from my Pixel 2 using Tapatalk
 
Nice! Good for you! Now videos so we can hear that sweet sound!


Sent from my iPhone using Tapatalk
Need to wait for the thread sealer to dry on the fuel pump. Hope to fire it up after work tomorrow.

Did I mention that it's loud???

Sent from my Pixel 2 using Tapatalk
 
Thread sealer cured on the fuel fitting back at the tank.

Buttoned up a minor coolant leak on a fitting on the thermostat housing.

Fired it up once more with great success. Still a lot of smoke, but I'm not hearing any exhaust leaks, so I'm sure it's just the coatings and gaskets burning off.

Dual electric fans keep up with temps. I have a 195deg thermostat and the temp hangs out right at 195 with one of the fans on. 2nd fan pops on at 200 when I rev it up and never got any hotter than 203 sitting in the driveway.

One issue that I'm having is when I go to start it, it feels like the starter is struggling...and after I shut down I can't start it...the starter makes a quick attempt, but sounds like it's not getting enough juice. When I have it shut down, the Sniper turns the fans on if it is still hot and I think the fans suck enough juice away from the starter. My battery is several years old and 600CCA. Voltage is 12.3 across the terminals. Might be time for a red or yellow top. Starter is a brand new PMGR from Tuff Stuff (#6124b), so I doubt it's the starter.

Front seats from PRP also showed up yesterday. Got the driver's side in. I'm still using the Corbeau mounts with sliders and they fit perfectly. I ordered the Daily Drivers and I had them made 2" taller so the headrest is actually head height for me. They are very comfortable and fit me well. The slider and notch that I put in the rear fender gives me plenty of leg room for my 6'1" 225lb self. Rear bench will take a little more time to get to the house. Because of it's size, it had to ship by freight.

Last couple things I need to do before I get it on the road:

-Install harnesses
-Bend the shifter a little more away from the dash
-Install new fuel filler neck, fuel fill hose and fuel vent hose...mine dry rotted and I accidentally crushed the metal filler neck

Pictures to follow later this evening. Need to figure out how to get a video posted here of the motor running. I know y'all are chomping at the bitts!
 
Low power is very hard on a starter. I would get a fresh battery ASAP.
 
Low power is very hard on a starter. I would get a fresh battery ASAP.
Yup. Just picked up a red top today. Not going to turn the key again until it's hooked up.

Sent from my Pixel 2 using Tapatalk
 
Hopefully I did this right...

For your viewing and listening pleasure...

To view this content we will need your consent to set third party cookies.
For more detailed information, see our cookies page.

Sorry about the crappy video

Sent from my Pixel 2 using Tapatalk
 
I can tell it's a V8 ! (y)
 
Just installed the Red Top. Tons of juice for the starter. Didn't struggle at all...even with both fans running before startup. I'd say I'm set there.

Got the other front seat installed...still waiting on the bench.

I have 8.5" between the seats, so my old Tuffy center console with radio will fit. Wasn't sure if I was going to need to get the 6" one or not.

The paint is a little beat up, so I'll probably scratch it up and hit it with the hammered finish rattle can. 341acb6d704e66550a85529a956a8a49.jpg

Sent from my Pixel 2 using Tapatalk
 

Jeep-CJ Donation Drive

Help support Jeep-CJ.com by making a donation.

Help support Jeep-CJ.com by making a donation.
Goal
$200.00
Earned
$10.00
This donation drive ends in
Back
Top Bottom
AdBlock Detected

I get it, I'm a Jeep owner and ad-block detectors kinda stink but ads are needed on this site. This is a CJ site, all the ads are set for autos (some times others get through.) I cannot make them just for Jeeps but I try.

Please allow ads as they help keep this site running by offsetting the costs of software and server fees.
Clicking on No Thanks will temporarily disable this message.
I've Disabled AdBlock    No Thanks