Build Thread 1979 CJ7 Rapid restore - 1 Year build from tired and rusty to all go and some show..

Build Thread 1979 CJ7 Rapid restore - 1 Year build from tired and rusty to all go and some show..
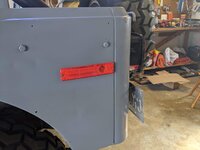
I forgot to add somewhere in the middle of my previous posts were the replacement of all lights. Headlight rings were in good shape and just needed a good polish. I contemplated going to LED headlights but I like the orignals. I ordered new signal lights and side marks by Omix, no complaints, fit is exact and quality is good. new pigtails were included as well..
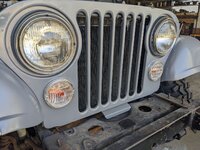
PXL_20220906_215326097.jpg


The orignal side markers were intact and usable they were just faded badly so for the cost I freshened them up.
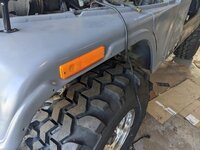
PXL_20220906_215336138.jpg

PXL_20220906_215347738.jpg

As mentioned previously the taillights are generic and avail at any auto shop around here for around $40CAD for the pair - $100CAD if you want LED versions.
 
Note on a comment I made above regarding the Holley jet tool and needing one if you are trying to re-jet while the carb is installed.. I did not realize that the throttle plate just pops off and the gasket is reusable so if you are re-jetting while the carb is instaled you can just take the bowl off then pop the throttle plate then swap them on the bench, as I mentioned its been 20years since I touched a carb! I have been taking off my carb becuase I cannot seem to gracefully drain the fuel without making a mess in the engine bay and its only a few mins to remove the whole thing then drain it away from the engine.

The new style re-usable gaskets these days are pretty good but they do seem to wear out after about 6 jet changes, at least one of mine did. for the price of these a good idea to have a spare set on the shelf.
 
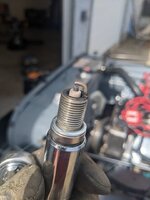
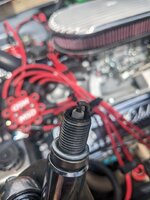
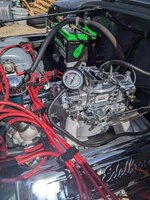
A little more tuning this weekend on the Carb, I got a much cleaner burn dropping the jets down one more size. The cleaner plug is at Primaries:63 and secondaries:67. Also got the vac guage out and tried to dial in the carb a bit tighter. I am still getting a little hestitation around 1800-2200RPM I need to sort through.

PXL_20230422_184422226.jpg

This was with P:64 S:68
PXL_20230422_184351325.jpg


PXL_20230422_173053785.jpg

Ahh yes the Nice Chrome Filler cap.. I have gone for 2 test drives and lost 2 of these crhome caps now.. I have gone back tothe Factory AMC Oil filler, these spring loaded Chrome caps just dont do well ontop if the stiff suspension and washboards on my gravel road!
 
Really nice work


Sent from my iPhone using Tapatalk
 
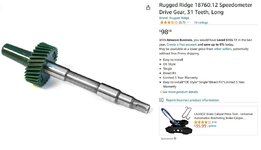
Time to get my speedo problem sorted out. When I first got it rolling the speedo was working, it was really jumpy then just died on me. Not sure what failed but since I have a second chasis I will use the new parts to figure out what is good/bad and shelf the spares that still work for later use.

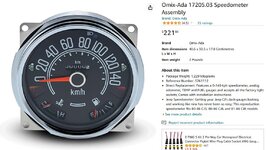
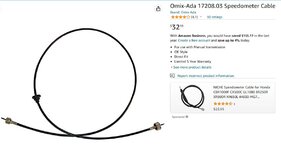
I found the rugged/omix parts on amazon and they were not bad prices (CAD$). I'll post some feedback on the quality and fit once I get everything installed.


speedoGear.jpg


speedo.jpg
SpeedoCable.jpg
 
Omix is a toss up, some is good, rest is :dung:, will be interesting to see how the gauge holds up

Sent from my iPhone using Tapatalk
 
Omix is a toss up, some is good, rest is :dung:, will be interesting to see how the gauge holds up

Sent from my iPhone using Tapatalk
I agree, I bought a Omix bellcrank kit.. push rod for the clutch fork was junk, adjusted it once as short as possible, still 2 inches too long then the cheap steel threading stripped on the way out and it wont move anymore so its in the scrap pile... I will definately post up some comments on the speedo quality.
 
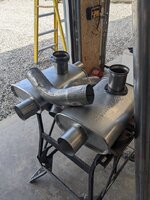
Had some spring time chores to do and well Amazon lost my last 5 orders so I havent been able to replace the speedo yet! I did make the decision to build a second exhaust system as the Borla sportsters are just too loud for me.. its really loud with that original setup.

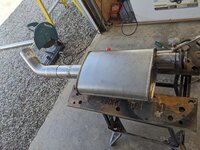
I looked around for something cheap as I wasnt sure how much quieter I was actually going to get it with the short distance I am working with so went with some $100CAD Thrush Hush mufflers. 3" in/out.

I am running the ball/socket style header flanges, if you havent used these before and still running he old flat style with gaskets I highly recommend checking these out, they are sooo much better.. no gaskets, allow you some adjustment on the ball and they seal perfectly everytime! They sell the 3" kit for around $60CAD for one ball and socket end.. Unfortunately you cannot buy just the socket so I am starting a collection of the ball side now :)

PXL_20230508_205447568.jpg

PXL_20230508_222911594.jpg

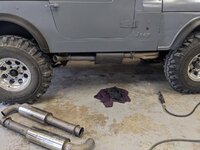
PXL_20230509_012203155.jpg

Its much quieter, rumbles very nicely! I think if you wanted to totally cut all noise the sizze of the cans would have to be huge due to the short pipe with the fenderwell headers. I used 45 degree bends this time, the 90's were blowing exhaust on you if you stood beside the doors, this is a bit better.

Note - No clearance loss on this, the mufflers are still higher than the frame and cross member.
 
Another update from the weekend on the Fuel side of things. I was having some fuel line challenges with the hard fuel line the guys at Bluemonkey installed. The hard line coming off the QFT 650 was a bit too long and my rubber fuel line was bending around the coil and way to close to the accessory belts to make the 90 degree turn over to the fuel pump side! I orignally bought a braided duel fuel rail from amazon - Evil Energy.. the thing leaked like a screen door and could not get it to seal on the carb bowls. I bought a much more expensive 6an setup from the local hotrod shop thinking that would be the difference.. Wrong the expensive kit ended up damaging my primary bowl threads and now my QFT650 is out of comission until I get a replacement bowl, threads were toasted when I tried remving the inlet fitting :( I ended up trying the Evil energy line again and this time it sealed up nicely.. go figure..

Good news is I re-jetted the Brawler 650 w/Manual secondaries. Now running P:62 S:64 jets at 3700' above sea level and getting a nice clean burn. I also dialed my timing (a hair over 15') in an have a nice clean plug strap now as well as I have rid the hesitation.. Now when I hit the throttle there is no studder just neck snapping action!

If you havent see this video on reading spark plugs check it out, one of the best I have come across yet! -
To view this content we will need your consent to set third party cookies.
For more detailed information, see our cookies page.
 
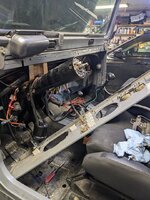
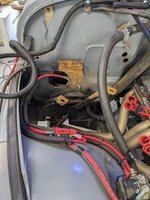
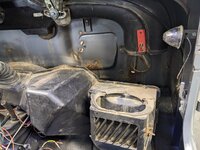
Slow weekend, too many chores to do around the farm! I did manage to get the dash tore out again so I can swap out the speed, cable and replace the heater core + the blower motor and freshen up the airbox. I have a second airbox from another chasis who's internals were a bit better so I swapped over a couple of the flappers. As you can see the seal between the lower and upper box is not great. I havent sourced everything I need yet and the video link at the bottom is supposed to include a decent parts list of the things you need for a major overhual that I will be checking out once I am ready but for now I need functional! When I eventually replace the body with a new tub I will do a proper restore of all the airbox components.

The blower motor and fan was not OEM in this chasis I found out when my fan wouldnt fit, luckily I had the second airbox and a good OEM fan.. that pile of junk old rolling chaisis I paid next to nothing for has save me a couple times when I cant get to the parts store or wait for something to ship here in a week!


PXL_20230516_2350480888.jpg

As you can see, all the rust is not out of this tub. I gave all this the quick wire wheel and rattle can cover up treatment just to slow it a little while I find a new tub!
PXL_20230517_215116380.jpg

Are these interior lights factory? >>>>
PXL_20230517_215123506.jpg

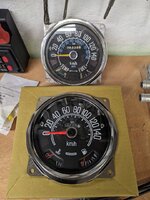
Here is a side-by-side of the speedo, says Omix on the order, came in a Rugged Ridge box, nothing on it that says who made it.. I definately like the factory better but operating it on the bench with the new cable I can feel it binding and sticking and not reposning at times. The new crown speedo cable also has a larger nut so a minor dremmel grind is needed to get the new cable through the firewall, just a couple hairs is all that needed, dont overdo it on the rubber gromet will end up too loose..

PXL_20230516_235059247.jpg

This guys video was great and saved me some fumbling around time. Had I watched this first I may have gone the upgraded motor >
To view this content we will need your consent to set third party cookies.
For more detailed information, see our cookies page.
 
Got he new speedo and new cable installed, works but it is still really bouncey under 50mph, I have not swapped my gear yet so we will see if that cleans it up at all. One complaint on the guage is turn signal indicators are not green, kind of yellowish white, not super easy to see in the sunlight, luckily for me the turn signal auto-off feature still works so I hopefully wont be the old guy with his blinker on for 10 miles! By the waythe rugged ridge box does have the Omix logo on it, missed it when I looked at it initially and commented above that there was nothing that indicated it was an Omix made Guage.

On the fuel gauge front.. I discovered my sending unit signal is not my only issue in the system. Out for a drive on the weekend and found out my fuel pickup tube is only reaching the top 5 gallons of the tank.. since my guage problems havent been resolved yet I have been keeping a close eye on the tank and just keeping it topped up after every short trip so I never let the level drop this low yet! Luckily I wasnt far from home so the call of shame to my wife with the request for a jerry can wasnt too bad!

Fuel tank drop in progress this week, pictures of problem to follow once I get it out and take a look at what is going on with this Crown sending unit and pickup tube.. May also tackle the speedo gear and a slight leak in the T-18 inspection cover..
Might consider cutting an access into the tub for the sender...not uncommon for those to routinely take a dump based on their origin of manufacture

A lot of guys have gone with marine style hatch type panels with covers...I just used a piece of plate with four self-tappers on the corners
 
Might consider cutting an access into the tub for the sender...not uncommon for those to routinely take a dump based on their origin of manufacture

A lot of guys have gone with marine style hatch type panels with covers...I just used a piece of plate with four self-tappers on the corner
Definately considering this, my tank is not bad since its all newly installed but its still a 3-4 hr job for me to drop it and put it back, a panel would cut that down by a lot!!
 
After pulling the tank again I found the problem seeems to be a couple things.Firsty this pickup filter came off and the sending unit appears to have twisted on me a little when I put it all toghether and the float appears to have been catching the side of the tank slightly. I marked it this time so there was no confusion which way my float was pointing when I tightened it down!!

Also the Mopar Jeep branded fuel guage I bought is backwards, it works off the reverse resitance range - 0 empty and full is 70 with no way to switch that without reversing the sending units potentiometer orientation which I am sure is possible if you have the patience or in my case that one is on its way back and I am now for something that can be calibrated to the specific range of your sending unit, the Holley EFI full sweep is nice, a bit pricey.
 
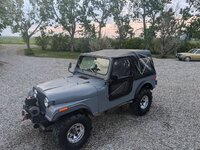
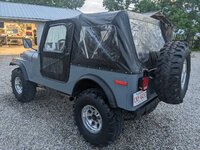
With some rain looming around I figured I better get after the dusty old factory top that came with it. After a good wash and a trip down memory lane on how the support bars sit I was able to get it installed again! Its a little tight and when I extend the rear pole fully I cannot zip up the back window. This factory AMC top is in amazing shape, only a couple snaps broken but the material is perfect, one small rip in the drivers door. I am missing the rubber stoppers for the riser poles. I cut some hockey puck material for now and using those as make shift stoppers, having trouble finding a replacement and may just need to fabricate some better ones.


PXL_20230526_032407321.jpg
PXL_20230526_032436203.jpg
 
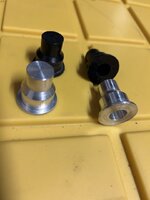
I had some made, an extra set. Never figured these plastic ones would last 40 years, or I would just loose one somehow. Let me know if you need measurements if you make some. The guy gave me that also just in case I needed that again. 3207B614-F78B-4564-BA7C-0D425C1A60E8.jpeg
 
I had some made, an extra set. Never figured these plastic ones would last 40 years, or I would just loose one somehow. Let me know if you need measurements if you make some. The guy gave me that also just in case I needed that again. View attachment 79583
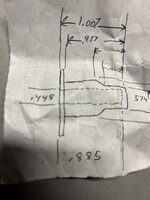
I dont have a lathe in my shop but I can make something functionally similar with my mig, some small tubing plus a couple of washers as the bottom rim stopper. Thanks for the picture that helped a lot, I just need the depth measurement the pole is supposed to stick through the cross bar, from the rim to the bottom of the pole hole
 
See if this will give you what you need. A6BE464A-4ECF-4DD1-A91A-BB9CA73D569D.jpeg
 
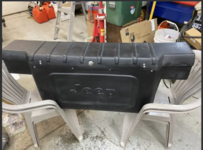
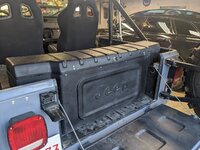
I have been a bit busy with the farm to spend time in the garage lately. I did manage to catch a search alert in the local buy and sell this week and I scored this rare beauty for a steal of a deal! it needs a new hinge but that is a simple fix, no cracks, no holes and he had the key!!
Screenshot_20230718-172956.png


PXL_20230719_022558545.jpg

PXL_20230719_022456214.MP.jpg
 

Jeep-CJ Donation Drive

Help support Jeep-CJ.com by making a donation.

Help support Jeep-CJ.com by making a donation.
Goal
$200.00
Earned
$10.00
This donation drive ends in
Back
Top Bottom
AdBlock Detected

I get it, I'm a Jeep owner and ad-block detectors kinda stink but ads are needed on this site. This is a CJ site, all the ads are set for autos (some times others get through.) I cannot make them just for Jeeps but I try.

Please allow ads as they help keep this site running by offsetting the costs of software and server fees.
Clicking on No Thanks will temporarily disable this message.
I've Disabled AdBlock    No Thanks