torque arm bushings w/pictures!
lowcountry
Jeeper
- Posts
- 182
- Thanks
- 1
- Location
- Moncure, NC
- Vehicle(s)
- '83 CJ7, 258, D30, amc 20, D300, 4sp, '70 Z28, LSX, 6sp, 711 fwhp (N/A), 2015 2500 HD Duramax/Allison
Replacing the bushings while I've got it apart. I don't think the op had them installed correctly - now trying to figure out what's right. I did a search and believe I am close to having it correct, but it just doesn't look right to me...
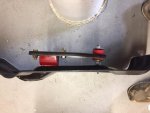
First picture has the outside bushing with the smaller diameter turned up. This allows everything to 'squeeze' together with no gaps.
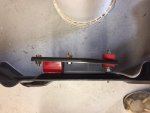
Second picture has the smaller diameter turned in, as I have seen done in other pictures I found. However, in doing so, it creates about 1/4" space between the arm and the bushing because the two smaller diameters thicknesses is thicker than the steel arm. It would take a lot of torquing down to take up this space.
Also, in both pictures, it seems the torque arm is bent too much- even with three washers. The tranny mount is stressed to one side as you can see...
What am I missing?
First picture has the outside bushing with the smaller diameter turned up. This allows everything to 'squeeze' together with no gaps.
Second picture has the smaller diameter turned in, as I have seen done in other pictures I found. However, in doing so, it creates about 1/4" space between the arm and the bushing because the two smaller diameters thicknesses is thicker than the steel arm. It would take a lot of torquing down to take up this space.
Also, in both pictures, it seems the torque arm is bent too much- even with three washers. The tranny mount is stressed to one side as you can see...
What am I missing?