Speed Hut Guages

Speed Hut Guages
Have you contacted Speed Hut about the tack? Tacks are pretty basic and should be accurate. I did look at those small tack speedometer, in the end I decided that those little tacks seem more like a sales gimmick than a real useful tack. Good idea, but to small.


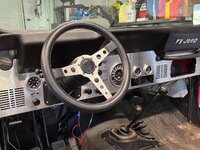
i did and they were really not much help. that reminds me though, the voltage gauge has a little hiccup too, namely it reads a bit too high. at idle or driving it reads right around 15v, maybe a hair over. i checked every possible place under the hood from the battery posts on down and they all read ~14.4 while running at idle so i am not worried (i've checked multiple times). i called speedhut about this and they say there is nothing wrong with their product but then again who would? with all the connections this thing has in the back the last thing i want to do is rip apart my freshly done dash again so i have learned to live with it.

Very nice looking!
As far as the tach goes. Are you runing a stock type ign system?
LG

yep. everything is new under the hood including the 258 from jasper with around ~800 miles on it.

Back when I had my Harley there were gauges with a small tach inside the speedometer. I actually strongly considered getting one until I realized that it would be almost impossible to quickly read the tach. Similar with the CJ version. Great idea though. I want a tach that is a quick read.

while the tach is pretty small it is easily viewable and you can read it no problem day or night. as i said before it looks neat but if i had the chance to do it all over again i would skip the tach. my ears tell me when i need to shift :)
 
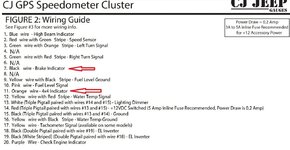
Quick question for those that installed the Speedhut speedometer… which wires do you use for the 4x4 and Brake indicators?

I am in the process of installing a new Speedhut speedometer. For the 4x4 and Brake indicators the new unit has a single wire for each. The factory light bulbs have two separate wires going into each. For instance the 4x4 indicator has an orange and a red. The Brake indicator has a black and a black/white wire. Any suggestions on which to use and why there are two into each of those?
 
The black wire for the brake warning light is what you need. That black wire goes to a splice under the dash and connects to the e-brake assembly and also goes through the bulkhead connector on the firewall to feed through and then connect down to the proportioning valve. You can disregard the black/white wire.

The 4WD red is the power coming in and the orange goes out through the firewall bulkhead connector to the switch on the transfer case that gets ground when shifted into 4WD. With the Speedhut gauge, you can just tape off the red wire. All you need is the grounding signal on the orange wire connected to the switch on the transfer case.

speedhut_wiring.jpg
 
Life saver thanks! One additional Q… the fuel gauge has two lines going into the new gauge, one is the fuel level sender which u am going to connect to the pink wire from the stock unit, the other is a ground. Any special place to ground that? Do I need to run that all the way back to the tank?
 
Connections #9 and #10 for the fuel sender unit (the yellow with black stripe and the pink wire) do connect to the fuel sender unit in the tank. These two wires should be run back to and connected to the sender unit. Normally the sending unit has the single wire running up to the gauges and then has a grounding wire connected to chassis ground at the rear of the vehicle. This chassis ground should be disconnected from the chassis and run to the front to connect to the yellow with black stripe wire. Since the gas tank has rubber isolators on the mounting straps and in the skid plate (if they're still there and not torn up) the gas tank is actually not grounded. In addition, there is a rubber o-ring where the sending unit goes in that insulates that from the metal of the tank as well. So the sending unit is not connected to any ground unless you have the grounding wire connected. So by disconnecting that from chassis ground and connecting it to the gauge's wiring instead, the gauge sees the direct resistance between the pink wire and the yellow with black stripe and no other variables in the circuit. This ensures the best reading. However, it can work with the sending unit grounded to the chassis at the rear and the gauge's yellow with black stripe wire also grounded up front if that's what you need/want to do. But your reading may not be 100% accurate all the time. So it's recommended to run that extra wire to the back.

speedhut_fuel_sender.jpg
 
Got it. Appreciate all the help. Wiring is not my forte

And for a ‘final Q’ for anyone that has installed the the CJ speedometer cluster. When you installed the Speedhut temp sensor, did you cut it down to match the length of the oem sensor or just leave it full length. Currently have mine threaded in at full length (304 V8). Wondering if I should be pulling it out and trimming it down.
 
Speaking as a Speed Hut gauge owner I will say the tach is easy to read, Yes it can drop signal, but after 5 repop gauges failures I bought this. My version looks close to stock. My journey to Speed Hut was after I found Dakota Digital and had a small stroke seeing the price tag.
 
I finally bought my gauges, i really like them so far easy to read and bright, get them on Black Friday sale


Sent from my iPhone using Tapatalk
 
Got my install; just about wrapped up over the weekend. Great quality gauges. Still need to check calibrations but seems like everything is working straight away. I opted to move the Tach to the left and then installed a equally sized Oil Pressure gauge on the right of the column (the clock seemed like a waste of space). Vac and Volts over the radio. My only pending issue is that when I turn off the ignition all the gauges freeze at whatever their most recent readings were. As soon as I trigger the ignition they go back to zero and run the normal start up sweep. Have a note into Speedhut and waiting to hear back. Seems like maybe I am not using the right power source.
 

Attachments

  • CJ Gauges.jpg
    CJ Gauges.jpg
    353.2 KB · Views: 5
Got my install; just about wrapped up over the weekend. Great quality gauges. Still need to check calibrations but seems like everything is working straight away. I opted to move the Tach to the left and then installed a equally sized Oil Pressure gauge on the right of the column (the clock seemed like a waste of space). Vac and Volts over the radio. My only pending issue is that when I turn off the ignition all the gauges freeze at whatever their most recent readings were. As soon as I trigger the ignition they go back to zero and run the normal start up sweep. Have a note into Speedhut and waiting to hear back. Seems like maybe I am not using the right power source.


mine do it to, thats just the way they work
 
  • Thanks for the Post!
Reactions: CJ
Speaking as a Speed Hut gauge owner I will say the tach is easy to read, Yes it can drop signal, but after 5 repop gauges failures I bought this. My version looks close to stock. My journey to Speed Hut was after I found Dakota Digital and had a small stroke seeing the price tag.
I did the Dakota Digital and never looked back. All worked one first power up, needles return to zero when ignition turns off, and used a BIM module to interface with my ECM for additional readings in the display windows. Yes, the price was higher than the Speedhut, but meet my needs perfectly and without any issue or complaint after 4 years of use so far.
 
If you want to delay the 12v power off so it lets the gauges all get back to zero just add a simple power off delay relay. You can get them as little as around $10.


Thanks CJ. Where would you wire that in? Not sure my OCD will let me live with them as is - I'll be retriggering the ignition every time I shut the damn thing off!
 
Thanks CJ. Where would you wire that in? Not sure my OCD will let me live with them as is - I'll be retriggering the ignition every time I shut the damn thing off!
It gets spliced into the +12v feed to the gauges. It keeps the power on to the gauges by a user defined amount of time after you turn off the key. It's an easy hookup.

Move power from gauges to relay (trigger).
Relay to constant +12v.
Relay to ground.
Relay to the gauges where you need power.
Adjust delay as needed.
 
Think I got it. Essentially, instead of wiring gauges to switched power. Wire them to constant power with this relay inserted in between the gauges and the constant power?
 
Their customer service team just got back as well. Apparently they sell their own solution as well:


Bit more spendy and I guess it also allows you to program your LED brightness...
 
I did the Dakota Digital and never looked back. All worked one first power up, needles return to zero when ignition turns off, and used a BIM module to interface with my ECM for additional readings in the display windows. Yes, the price was higher than the Speedhut, but meet my needs perfectly and without any issue or complaint after 4 years of use so far.
this is the way. X2 for me. I used their set up for a 40-47 truck. My set up worked perfectly.
 
Am loving the Speedhut setup. They did a great job replicating the CJ fonts / design and can do just about any type of gauge to match
 

Jeep-CJ Donation Drive

Help support Jeep-CJ.com by making a donation.

Help support Jeep-CJ.com by making a donation.
Goal
$200.00
Earned
$0.00
This donation drive ends in
Back
Top Bottom
AdBlock Detected

I get it, I'm a Jeep owner and ad-block detectors kinda stink but ads are needed on this site. This is a CJ site, all the ads are set for autos (some times others get through.) I cannot make them just for Jeeps but I try.

Please allow ads as they help keep this site running by offsetting the costs of software and server fees.
Clicking on No Thanks will temporarily disable this message.
I've Disabled AdBlock    No Thanks