Build Thread Project JPSK8

Build Thread Project JPSK8
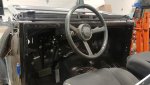
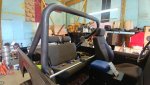
Stopped by the upholsterer on the way home from work yesterday. He still has to do the rear seat (we needed to discuss how I wanted it done & I left my Laredo seat with him as a guide), but everything else is done & I think it looks awesome. He duplicated the '80 Renegade pattern (unfortunately my original upholstery had to be sacrificed) but went with a more vibrant blue. I had him do the sun visors too as well as a wrap for the grab bar and the armrest for the Tuffy console.
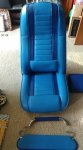
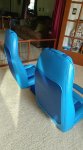
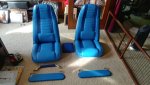
 

Attachments

  • 32508353_10214037148341434_2584139478197075968_n (1).jpg
    32508353_10214037148341434_2584139478197075968_n (1).jpg
    54.1 KB · Views: 43
  • 32925799_10214037148661442_7502191028586151936_n.jpg
    32925799_10214037148661442_7502191028586151936_n.jpg
    57.1 KB · Views: 60
  • 32776992_10214037147621416_2185587528403255296_n.jpg
    32776992_10214037147621416_2185587528403255296_n.jpg
    67 KB · Views: 48
WOW them seats look awesome did you hide LEDs in them they look like they are glowing
 
WOW them seats look awesome did you hide LEDs in them they look like they are glowing

I'm gonna need shades :) It took about an hour for the smile to fade from my face a little bit...super happy with how they turned out. Even my wife smiled and said "wow" when she saw them. He set the bar high for the rear seat...
 
Dropped everything off at the new powder coater on the last day of school, hopefully will have it all back by the end of this week so that reassembly can begin (they also do ceramic coating, so they have the manifolds too). Have a potential buyer coming for the original tub...noticed a few more things about the repro tub...doesn't have the threaded holes in the firewall for the fuse block to attach, doesn't have any of the weld nuts for attaching the dash or the steering column collar, and there is no seam sealer on anything. Have some seam sealer on order and getting ready to order up some weld nuts, just want to make sure I didn't miss anything else.
 
I think if I ever get a replacement steel tub it will come from Willy’s they take the tubs and put jigs on them for all the holes and I believe the weld the nuts on them as well


Sent from my happy place using Tapatalk
 
I think if I ever get a replacement steel tub it will come from Willy’s they take the tubs and put jigs on them for all the holes and I believe the weld the nuts on them as well


Sent from my happy place using Tapatalk

This IS the Willys tub...the mounts are all fixed and most of the firewall is corrected, but it's not 100% "correct". Found a few more items once I put the tubs side by side this evening: doesn't have the pass through for the ECM harness, doesn't have reinforcements for the battery tray mounting areas (nor does it have the weld nuts), no plates & weld nuts for the fenders, missing 3 or 4 firewall studs, doesn't have the threaded mounting holes for the tail-lights, doesn't have the hole in the step brace for the wiring harness to pass through (Scrambler only item). Headed back out to the shop to make a couple of templates & see if I missed anything else. FYI: it comes with a repro dash mounted in it (also missing studs for the speedo & speakers, but does have a nice steel glovebox).
 
This IS the Willys tub...the mounts are all fixed and most of the firewall is corrected, but it's not 100% "correct". Found a few more items once I put the tubs side by side this evening: doesn't have the pass through for the ECM harness, doesn't have reinforcements for the battery tray mounting areas (nor does it have the weld nuts), no plates & weld nuts for the fenders, missing 3 or 4 firewall studs, doesn't have the threaded mounting holes for the tail-lights, doesn't have the hole in the step brace for the wiring harness to pass through (Scrambler only item). Headed back out to the shop to make a couple of templates & see if I missed anything else. FYI: it comes with a repro dash mounted in it (also missing studs for the speedo & speakers, but does have a nice steel glovebox).


Oh :dung: you gotta be kidding me... on their videos they tote them selves so highly for fixing all that


Sent from my iPhone using Tapatalk
 
It's basically just one guy at this point and he has a guy who comes in to do the tubs as he gets orders for them...I think I figured based on his estimated sales that he does about two per month...not exactly a real money maker. The main thing they tout is the correction of the body mounts & supports so that the tub can be bolted on within an hour...the rest is really just cutting/modifying firewall holes...doesn't say anything about welding in studs & tab nuts. You could probably request that they do it for a few bucks more. The quality control from the place in the Phillipines that makes them is pretty much non-existant...no two tubs are alike in how out of place the mounts & holes are. What's left to do is a cakewalk compared to getting the mounting correct.
 
Picked up the frame & assorted parts from the powder coater this afternoon, so it's just about time to start making this look like a Jeep again (need to hit everything with the tap & die kit to clean up the threads from the galvanizing). Pics after this should be of a rolling chassis
 

Attachments

  • 34847712_10214212166316774_8174907297982578688_n.jpg
    34847712_10214212166316774_8174907297982578688_n.jpg
    71.9 KB · Views: 67
  • 35142501_10214212166676783_6240716875567726592_n.jpg
    35142501_10214212166676783_6240716875567726592_n.jpg
    62.3 KB · Views: 88
  • 35086709_10214212167476803_957628405354856448_n.jpg
    35086709_10214212167476803_957628405354856448_n.jpg
    84.4 KB · Views: 84
  • 35151490_10214212167916814_8316674139674902528_n.jpg
    35151490_10214212167916814_8316674139674902528_n.jpg
    84.6 KB · Views: 78
Almost rolling...didn't have a 9/16-20 bottoming tap to clean out the threads in the u-bolt skids so I could install the sway bar & shock studs. Getting ready to leave for vacation, so no Jeep work for the next couple of weekends :(
 

Attachments

  • 35485165_10214254190207345_1423302928684285952_o.jpg
    35485165_10214254190207345_1423302928684285952_o.jpg
    81.7 KB · Views: 61
  • 35817923_10214257530050839_7808763801309806592_n.jpg
    35817923_10214257530050839_7808763801309806592_n.jpg
    65.5 KB · Views: 48
  • 35748977_10214257530490850_6699847715573989376_n.jpg
    35748977_10214257530490850_6699847715573989376_n.jpg
    66.4 KB · Views: 52
Back from vacation...Bora Bora was absolutely beautiful!!! Add it to your bucket list...took two years of planning, reservations & saving & using a Venture card for travel points, but it was SO worth it...never took so many pictures before in my life. We rented an over the water bungalow that used to be owned by Marlon Brando across from the lagoon from the motu that the airport is on. It has it's own small dock, so we got door to door service for the water-based activities that we did. Heading back out to Japan in a couple of weeks, grandson is due any day now (wow, I feel old!!).

She's a roller again!! Cleaned out the threads on the u-bolt skids, installed the steering box brace & started hooking up the stainless steel brake lines & hoses.
 

Attachments

  • 36375530_10214335604282646_5796928221383491584_n.jpg
    36375530_10214335604282646_5796928221383491584_n.jpg
    27.4 KB · Views: 42
  • 36723862_10214398930545763_1854983576139857920_n.jpg
    36723862_10214398930545763_1854983576139857920_n.jpg
    63.1 KB · Views: 51
  • 36767827_10214398929265731_7741909431301963776_n.jpg
    36767827_10214398929265731_7741909431301963776_n.jpg
    65.6 KB · Views: 49
  • 36866251_10214398929825745_140234530505097216_n.jpg
    36866251_10214398929825745_140234530505097216_n.jpg
    69 KB · Views: 69
  • 36321766_10214344897954982_5806603008879886336_n.jpg
    36321766_10214344897954982_5806603008879886336_n.jpg
    30.9 KB · Views: 48
Not a lot of time, but lot's happening. Set the body on so that I could start mocking everything up & making any necessary adjustments & drilling holes ahead of painting. Monday was delivery day as my Bulltear order finally arrived as did my grandson!! Malachai clocked in at a touch over 9 pounds and 20 inches (both my son & his wife are ~6' tall, so not surprised). Leaving for Japan on Saturday to visit & help out, so two more weekends of no Jeep progress, but it's worth it :)
 

Attachments

  • 37221770_10214456164496576_2761180796097134592_n.jpg
    37221770_10214456164496576_2761180796097134592_n.jpg
    74.9 KB · Views: 43
  • 37185963_10214456164016564_7949936563125747712_n.jpg
    37185963_10214456164016564_7949936563125747712_n.jpg
    44.9 KB · Views: 42
  • 37150898_10214456253618804_2256189901621952512_o.jpg
    37150898_10214456253618804_2256189901621952512_o.jpg
    89.8 KB · Views: 40
  • 37169880_10214467479819452_8739768623519760384_o.jpg
    37169880_10214467479819452_8739768623519760384_o.jpg
    58.2 KB · Views: 34
Back at it working on the mock up...I think I would have pulled my hair out if I hadn't gone with the Willys-Overland Repli-Tub option to correct the body mounts...darn near everything else on this tub is off. Triple tap on an extension cord to keep my drill (switching between a step bit & combo drill/tapping bits) & two angle grinders (one with a cut-off wheel, the other with a flap disc) at the ready. The fit & finish is a bit disappointing for the price tag, but I'll make it work.
 

Attachments

  • 39010604_10214650580716860_5846266653901324288_n.jpg
    39010604_10214650580716860_5846266653901324288_n.jpg
    67.1 KB · Views: 40
  • 39105156_10214658425072964_1087544367125626880_n.jpg
    39105156_10214658425072964_1087544367125626880_n.jpg
    62.6 KB · Views: 62
  • 38992277_10214658424392947_5957325712082862080_n.jpg
    38992277_10214658424392947_5957325712082862080_n.jpg
    61.6 KB · Views: 84
  • 39042059_10214658424032938_5470825154328133632_n.jpg
    39042059_10214658424032938_5470825154328133632_n.jpg
    64.9 KB · Views: 77
  • 39032468_10214650581236873_6793219681818771456_n.jpg
    39032468_10214650581236873_6793219681818771456_n.jpg
    47.7 KB · Views: 35
The Willys-Overland tub is suppose to be a perfect fit after they modify it. What areas did you have problems with?
 
The Willys-Overland tub is suppose to be a perfect fit after they modify it. What areas did you have problems with?

They advertise it as ready to bolt-on within an hour, which it is after they lay their frame jig on it and correct the body mounts. They make a few adjustments to the firewall as well, but that's about it. No reinforcements or weld nuts on the firewall, seams aren't sealed, no bolt holes for the tail-lights, tire carrier, tire stop, door strikers, or windshield washer, some of the other holes are anywhere from a little bit off to way off, no hole in the step brace for the rear wiring harness to pass through, tunnel cover area is wrong (cut & flanged square). Nothing that can't be tweaked, but you have to mock everything up before paint if you don't want to be cutting, drilling & grinding on a fresh paint job. A bit disappointing for the price, but that's MD Juan's fault.
 
Thanks for the info. Looking really good so far!
 
Still mocking up, hoping to finish this weekend and get the body out to paint here shortly while it's still warm. Decided on Ford Nitrous Blue.
 

Attachments

  • 40072180_10214751848528492_6863170963765198848_n.jpg
    40072180_10214751848528492_6863170963765198848_n.jpg
    52.6 KB · Views: 37
  • 40031609_10214751847928477_5116253304573132800_n.jpg
    40031609_10214751847928477_5116253304573132800_n.jpg
    57.5 KB · Views: 40
  • 39934509_10214759554481136_7786402376205729792_n.jpg
    39934509_10214759554481136_7786402376205729792_n.jpg
    60.9 KB · Views: 35
  • 40211735_10214759555921172_8031196901984436224_n.jpg
    40211735_10214759555921172_8031196901984436224_n.jpg
    46.2 KB · Views: 32
  • 40098622_10214759556641190_7057608277898559488_n.jpg
    40098622_10214759556641190_7057608277898559488_n.jpg
    57.4 KB · Views: 42
Pictures continued...
 

Attachments

  • 40056702_10214751848248485_7593148407166795776_n.jpg
    40056702_10214751848248485_7593148407166795776_n.jpg
    45.3 KB · Views: 29
  • 40562593_10214801541450784_8356980277444083712_n.jpg
    40562593_10214801541450784_8356980277444083712_n.jpg
    59.5 KB · Views: 67
  • 40082797_10214759557041200_5997273280212369408_n.jpg
    40082797_10214759557041200_5997273280212369408_n.jpg
    66.7 KB · Views: 40
  • 40097751_10214751848968503_5565890604702892032_n.jpg
    40097751_10214751848968503_5565890604702892032_n.jpg
    53.3 KB · Views: 30
  • 40065046_10214751849528517_7446495868376580096_n.jpg
    40065046_10214751849528517_7446495868376580096_n.jpg
    61.9 KB · Views: 60
As she sits right now. Front clip is off (hood is in the house garage for installation of the louvers, grill is in the basement for fitup of the radiator, trans cooler & AC condenser), windshield frame is in the basement for installation of a better cowl seal & the wipers (went with the WipeBoy billet setup), dash is in the garage for sanding & painting (going with Toyota Electric Blue on it for some contrast and also ordered SpeedHut gauges for it...caught the Labor Day sale). I had the machining students at work drill & tap some 1/4 flat stock that I had on hand to make the reinforcement & mounting points for the fenders & battery tray & drill out some bolts so that I can pass wiring through them. My Bullear order came in a while back (timing cover, etc) and then I ordered the serpentine kit which arrived within a week, so once the body stuff is wrapped up I'll finish assembling the engine (have to check with the coater to see what's going on with the ceramic coating on my manifolds, been a few months now).
 

Attachments

  • 40599058_10214812886294398_4940633135516745728_n.jpg
    40599058_10214812886294398_4940633135516745728_n.jpg
    60.4 KB · Views: 28
  • 40763812_10214812885534379_4218685459892535296_n.jpg
    40763812_10214812885534379_4218685459892535296_n.jpg
    68.3 KB · Views: 33
  • 40504698_10214801542090800_2966808492901400576_n.jpg
    40504698_10214801542090800_2966808492901400576_n.jpg
    64 KB · Views: 35
  • 40604763_10214812885934389_7298421222964985856_n.jpg
    40604763_10214812885934389_7298421222964985856_n.jpg
    65.1 KB · Views: 33

Jeep-CJ Donation Drive

Help support Jeep-CJ.com by making a donation.

Help support Jeep-CJ.com by making a donation.
Goal
$200.00
Earned
$10.00
This donation drive ends in
Back
Top Bottom