Build Thread Here we go again............

Build Thread Here we go again............

TnCJ

Senior Jeeper
Posts
566
Thanks
6
Location
South East Tennessee
Vehicle(s)
1980 CJ 5, 4.2 engine, D30,AMC 20, T176, Dana 300, MC 2100 carburetor.
I should of started a build thread on my 1980 CJ5, but I had pretty much finished it before I found this site.
Of course as we all know we NEVER finish lol.
My 1980 has a tired engine, I doubt that it has ever been rebuilt. I'm starting to get a knock in the bottom end, oil pressure is very low, 15 psi going down the road and dropping to almost zero at idle.
I do love driving it though, brings back memories of my younger years when I owned a 1970's CJ5. But I always have it in the back of my mind when i'm driving it that the engine could give out at any time and leave me stranded. So I decided it was time for a rebuild. As luck would have it I stumbled on a "project" Jeep that someone had started for their son. Poor ole Dad had spent a couple of years rebuilding and then the son decided he would rather have something else so Dad decided to unload it.
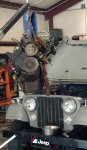
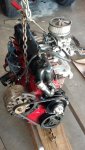
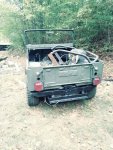
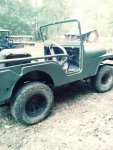
Ends up it is a 1972 model, with a 1984 rebuilt engine that has only been run on the stand, new clutch, pressure plate, throwout bearing etc, has a rebuilt Dana 44 rear end, T-150 tranny, Dana 30 front axle, and not sure about the transfer case but guessing it's a Spicer 20. The body is rough but fixable, frame has also seen better days but it has been patched and whoever did it has done a pretty good job.
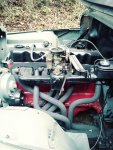
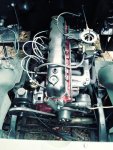
My plan is to pull the engine and mate it up to my T176 tranny and Dana 300 transfer case. I also plan on swapping my old exhaust, intake manifold to the new engine, for some reason the PO put a new 1 barrel intake manifold and what looks to be a Carter YF carb on it????? He also put headers on it. I've not decided if i'll keep the headers or not.
Long term I don't know what i'll do with the rest of the 1972 Jeep. I could part it out as is. Rebuild my old engine and put it back in the 1972 and use it as a farm vehicle, or????????????????
I could even swap the rear axles out, I like the looks of that Dana 44!!
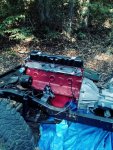
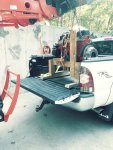
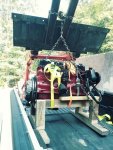
I snapped a few pics this morning before I started taking things apart. I plan on removing the body tomorrow then start pulling the engine this week.
I probably won't switch engines until this Winter when things slow down and I get bored lol.
Stay tuned...................
 

Attachments

  • body1.jpg
    body1.jpg
    98.5 KB · Views: 81
  • body2.jpg
    body2.jpg
    96 KB · Views: 53
  • engine2.jpg
    engine2.jpg
    98.6 KB · Views: 65
  • engine1.jpg
    engine1.jpg
    96.9 KB · Views: 76
Spent the morning taking the body off. It was pretty easy, the PO had recently removed it and put it back on so no rusty nuts & bolts to contend with.
Since I was working alone and don't have an engine hoist and the donor Jeep is hanging out down at the garden I used my tractor with a front end loader and forks to yank the body off.
Also removed the intake/exhaust manifold and took a hacksaw to the headers to get them off. They were welded all the way to the rearend. I didn't damage them, I cut them off past the collector so if I do decide to reuse them they can be welded back.
Still scratching my head why the PO used a brand new 1 barrel intake manifold with the Carter YF 1 barrel carb then put headers on.
Got a bunch if honey do's tomorrow so won't get any work done on the Jeep. Hopefully i'll get the motor pulled Saturday and get it in my basement and out of the weather.
I took some pics but haven't found the time to upload them, will try to do so tomorrow.
A big thanks to Posi for answering some questions regarding my T176 fitting the new engine. I was in freakout mode.............
I said in my original post that the engine was an 84 model, It is in fact a 1978
block with an 84 crankshaft. The Jeep itself is a 1972 model. There aint no tellin what year the other parts are.
 
Last edited:
Here's a pic of what I did yesterday.
Today I disconected the power steering lines, fuel line, and anything connecting the motor to the frame.
I separated the transmission from the motor as well. It was pretty easy and came apart without too much persuasion. I will hopefully pull the motor out tomorrow and get it into my basement and out of the weather. Luckily it has been dry here but rain is supposed to move in Sunday and Monday.
Working on it outside on uneven ground isn't the best working conditions and with the temps in the mid 90's makes it even worse.
I spent part of the day building an engine stand to put the motor on after I pull it. The plan is to pull motor, put it on the stand, hoist it into the back of my truck, haul it to the house, unload it and roll it into the basement.
 

Attachments

  • body off.jpg
    body off.jpg
    101.6 KB · Views: 46
Pulled the motor today and got it on my homemade engine stand. I now have a "crate engine" lol. I really should buy an engine stand, cherry picker and transmission jack. But i'm kind of a tightwad and usually make do with what I have on hand.
I may pull the T-150 transmission out tomorrow or in the near future and get it in the dry.
I was a nervous wreck loading and unloading it in and out of the bed of my truck. But it all went well. A cherry picker sure would of come in handy!
I feel better now having it out of the weather and in my basement.
The wife helped...............a little.
 

Attachments

  • unloading 1.jpg
    unloading 1.jpg
    97.1 KB · Views: 58
  • unloading 2.jpg
    unloading 2.jpg
    98 KB · Views: 59
I was wondering what the stand would look like.
 
I was wondering what the stand would look like.
It's not much to look at but will serve the purpose. I had casters on it but they were too small and wouldn't roll worth a :dung: so I took them off.
 
It's not much to look at but will serve the purpose. I had casters on it but they were too small and wouldn't roll worth a :dung: so I took them off.

I'm lucky to have a friend lend me his stand, and when I need it a hoist. Had the stand probably 2 1/2 years now. To darn long.
 
Getting the new engine ready for the swap hopefully in the next couple of weeks.
Took the old clutch and pressure plate off, installed the correct size pilot bushing [I hope] and installed the new pressure plate and clutch. The clutch and pressure plate that was on the engine was new but was for a T-150 transmission.
I hope the swap goes well and won't take but a couple of days, my Jeep isn't my DD but I sure do enjoy driving it. I take it for a short drive just about every day but am afraid to get too far from home since the old engine is on it's last legs.
Still not decided what i'll do with the donor Jeep. I may rebuild the old engine and reinstall it and use it as a farm vehicle or ???????
 
My buddy called me the other day and said he was caught up enough to start on my engine swap.
Loaded the "new" engine into the bed of my truck and delivered it to him then drove the Jeep over today.
My friend prefers to work alone so looks like I won't get to help very much. I wish I had the equipment and space to do it myself but I know my limitations. He did say he would give me a holler to help him when he yanks the old engine out and installs the new one though.
He was impressed with the looks of the donor engine and thinks [hopes] the swap will go smoothly. He has a couple of other jobs going on so will have to switch out from one job to the other.
I miss my CJ already and hope I get it back soon. I'm anxious to see how he runs with the new engine.
We both decided to put the stock exhaust on instead of the headers. I installed headers on my first CJ and had problems from day one with them.
Fingers crossed for a successful transplant!!
 
Out with the old and hopefully in with the new soon.
My mechanic friend is slow but good, he takes his time but does great work.
I told him it might of been easier to take the grill off but he insisted he had the tools to do it "his way" and looks like he did.
Only problem he has encountered so far is the exhaust down pipe coming off the exhaust manifold. He finally just cut the pipe and said it will be easier to get it off now that it's out of the engine bay.
The old motor is a greasy nasty mess, it was leaking badly from the valve cover and main rear bearing.
 

Attachments

  • out with the old.jpg
    out with the old.jpg
    97.9 KB · Views: 49
Spent some time at my friends garage today. He finally let me "help" lol.
The new engine is ready for it's new home.
Put the intake-exhaust manifold from the old engine onto the new one, also installed the power steering pump and alternator.
Hopefully we will install the engine tomorrow.
I am anxious to hear it run and get back on the road again!!
 

Attachments

  • new engine.jpg
    new engine.jpg
    98.2 KB · Views: 34
Looking good!
Screwdrivers for leveling wink.gif

Might be different on your model year but I think PCV on the rear and breather on the front, IIRC there is a baffle under the valve cover
 
Might be different on your model year but I think PCV on the rear and breather on the front, IIRC there is a baffle under the valve cover
You are correct. But the hoses were too short to reach the other way lol. I will get replacement hoses ASAP.
 
Well got the new motor installed today. Had a few hiccups along the way.
As we were filling the radiator with antifreeze we noticed a large leak where the thermostat housing mates to the block. Seems the guy who rebuilt the engine used a bolt that was just a little too long and the thermostat housing would not pull up tight to the block. The bolt was bottoming out in the hole.
Had to run to the parts store for a new gasket. Bought two because you never know..............
Fixed the leak and topped off the radiator, checked everything again and with fingers crossed cranked the engine...........it turned over fine but would not fire off. Checked to make sure we were getting fuel, we were, checked that we were getting fire to the plugs, we were.
Seems we were way off on the timing. Bumped the engine to TDC, took the dizzy out and rotated it where the rotor was pointing to #1 cylinder. Crossed fingers again cranked the engine and he came alive!!!
Whew, what a relief!!
Took a short drive around the block, and pulled back into the garage and checked for leaks, there were none.
Now for the bad part........on the drive home I noticed smoke in the cab. Immediately pulled over to the side of the road, popped the hood and there was oil all over the manifold.
Bassod had mentioned in an earlier post that my PCV valve and valve cover breather were reversed. I knew that but that's how my old engine was configured and we used the same arrangement on the new engine because one of the hoses was just a little too short.
Anywho, I was just a couple of miles from home so I slowly drove there.
When I got home I dug around and finally found a piece of hose that almost was long enough to switch the PCV and filter around.
Took it for a short drive and again started seeing smoke. Pulled off and the manifold was again covered in oil.
Now i'm a little baffled as to why??
I just now cleaned the filter [it was full of oil] and checked the PCV valve, the PCV valve seemed ok, it rattled when I shook it but I cleaned it out anyway.
Took another short drive and although I didn't see any smoke I did notice some oil again on the manifold when I got home.
I'm going to run to town in the morning and get a new PCV valve and a couple of feet of 1/4" tubing. If that doesn't fix it i'm stumped.
Any suggestions greatly appreciated!!
 
Valve cover gasket?
I really don't think it is the valve cover gasket, it's brand new, but I will recheck it in the morning.
It's hard to tell but looks like it's coming out of the breather on the valve cover.
When it's just sitting and idling no leak. It only leaks when driving down the road.
I did notice the grommets for the breather and PCV valve were brittle, and probably not sealing well. I'm going to try to get replacement grommets when I pick up a PCV valve in the morning.
 
Valve cover gasket?
Well color me embarrassed!!
After all my fumbling around with the PCV valve and grommets it still leaked.
In frustration I took the valve cover off, removed the junky cork gasket and slathered a lot of RTV on both sides and reinstalled.
Still leaking a little, but not nearly as much as before. At least I know where it's leaking from now. [I hope]
Going to run to town here in a bit and see if anyone has a Felpro rubber gasket. If not I will be ordering one ASAP.
Thanks caveman you saved the day!!

It was just a wild guess. I've had problems with them before and have got them installed crooked.
 
All the valve cover gaskets I found locally were cork so I ordered a rubber Fel-pro one from Summit along with new grommets.
I tried tightening down the old one again and it just made the leak worse. So now I again wait.....................
 
Got my valve cover gasket the other day.................wrong one!!!
Ordered another one from a local auto parts store Saturday. They said it should be in Monday so Sunday I pulled the Jeep into the basement and took the valve cover off again to get a headstart.
Monday rolled around......no valve cover, they said check back Tuesday. I waited till noon and gave them a call. The counter guy said "yep it's here" drove to town went inside and guess what?? No valve cover gasket??!!
I told them to forget it I would go elsewhere. Big mistake, drove to every auto parts store in town and nobody had one, not even a cork gasket.
Soooo reordered again.
In the meantime I picked up a tube of "the right stuff" gasket maker, I was going to use it to install the new gasket but after reading about it a lot of people just use this stuff without a gasket.
So what the heck, i'll give it a try. I put a healthy bead on the valve cover flange and another bead on the engine. Snugged it down just a little, let it sit for about an hour and took a short test drive. Got home, popped the hood and just a little oil had seeped out. Snugged it down just a wee bit more and as I was about to close the hood the upper radiator hose decided to let go. Antifreeze going everywhere.
I should of replaced the hoses when we installed the motor but they seemed ok. Luckily the hose split around the clamp on the thermostat housing and I was able to cut the bad part off and reclamp.
Took another little ride around this morning and just a very small amount of oil had seeped out. And no antifreeze leak.
So, it's still leaking a little but should be ok until I hopefully get a gasket in the next couple of days.
On a side note, the new engine is running fine. Oil pressure stays a steady 50+ lbs with a warm engine going down the road and around 30+ at warm idle.
 

Jeep-CJ Donation Drive

Help support Jeep-CJ.com by making a donation.

Help support Jeep-CJ.com by making a donation.
Goal
$200.00
Earned
$10.00
This donation drive ends in
Back
Top Bottom
AdBlock Detected

I get it, I'm a Jeep owner and ad-block detectors kinda stink but ads are needed on this site. This is a CJ site, all the ads are set for autos (some times others get through.) I cannot make them just for Jeeps but I try.

Please allow ads as they help keep this site running by offsetting the costs of software and server fees.
Clicking on No Thanks will temporarily disable this message.
I've Disabled AdBlock    No Thanks