Electrical Gauge Wiring Short

Electrical Gauge Wiring Short

rcazparts

Jeeper
Posts
26
Thanks
2
Location
Fort Worth
Vehicle(s)
1979 CJ7, 304
My fuel gauge and temp gauge did not work. Inspection showed fuel gauge was bad. Took it apart and obvious heat issues. Replaced both guages. No power to cluster. Found 3amp fuse blown. Replaced. Fuel worked immediately, then it did not. Fuse blown again. Rinse, repeat. Put 5amp in, blew immediately. Dead short somewhere. Any suggestions on where to start looking? Thinking behind fuse block. Any one experience this before?
 
1st thing is check continuity from + to ground with fuse pulled to figure out where the short is and by disconnecting grounds you'll be able to determine where the short is.
Just because it's a new gauge doesn't mean it's not deffective.
If the sender was bad it would be open or read empty or shorted to ground and read full.
I'm betting it one of the gauges in the cluster but the only way to tell is by testing one by one.
 
Some simple checks you can do:
1. Pull gauge fuse before doing resistance checks (ohms or continuity) on gauge cluster to ensure no voltage is present.
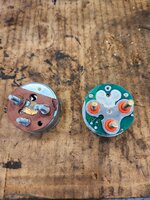
2. To eliminate reading through other components besides the gauges, disconnect the purple wire on the temp sending unit on the engine and disconnect the ground on the fuel level sending unit at the rear of the vehicle. Both of these sending units connect to ground normally and will cause your resistance measurements on the various terminals on the back of the gauges to give readings that are not through the gauges themselves. Or just pull the cluster and have it on the work bench.
3. Use VOM to check resistance between "I" terminal on back of fuel gauge (red wire where +12V comes in from the fuse) to ground. Should be approximately 50 ohms. Less indicates a short. Higher indicates a defective gauge.
4. Use VOM to check resistance between "S" terminal on back of fuel gauge (pink wire from the sender unit in the gas tank) to ground. This reading will vary based on the amount of fuel in the tank if you didn't disconnect the ground. To eliminate that variance, disconnect the ground wire from the sending unit itself at the rear of the vehicle. Now your measurement will not measure the resistance of the sending unit, but any possible short in the wiring going from the gauge cluster to the sending unit (running from front to rear of the vehicle). Should read around 70 ohms as you are now reading the same original 50 from the prior step, plus an extra 20 or so through the gauge mechanism itself. Higher? Gauge is bad. Lower means a short somewhere.
5. Use VOM to read terminal "A" on the fuel gauge to ground. This is the insulated "strap" that goes between the fuel gauge and the temp gauge. Inside the fuel gauge, the +12V is dropped to about +5V to supply the temp gauge. Should be about 50 ohms.
6. Now use VOM to measure between the "A" terminal on the fuel gauge to the terminal on the temp gauge where the purple wire connects (coming from the temp sending unit). This is reading through the temp gauge mechanism and should about 20 ohms.
7. Now with the purple wire disconnected from the gauge, measure from that purple wire to ground. This should read nothing, or infinity, since the temp sending unit is disconnected. If you get a reading, that wire is shorted somewhere.

gauge_readings.jpg

Most common areas for shorts are as follows:
1. Purple wire from back of temp gauge going through the bulkhead connector on the firewall out to the temp sending unit on the engine. This wire can get pinched or has been damaged under the dash or in the engine bay; most common in the engine bay where insulation can be burned/cracked and it's touching a ground contact somewhere.
2. Insulated "strap" between fuel gauge and temp gauge when the internal voltage regulator (inside the fuel gauge) shorts/fails and a higher voltage (full +12 instead of lower +5) is present. This is common even in new aftermarket gauges with poor voltage regulators. See below for an option to mod this.
3. Gauge mounting screws. The mounting screws for the fuel and temp gauges rely on small insulators around the mounting screws to keep the terminals insulated from ground. If these are damaged, missing, or tightened too much when installing, these terminals can get grounded where they're not supposed to be. The resistance checks above should identify if this has happened.

Mod for +5V regulator:
1. Use a standard USB charger adaptor that plugs into a +12V cigarette lighter socket.
2. Disconnect the +12V red wire from the "I" terminal on the back of the fuel gauge. This is the power feed that comes from the fuse that is blowing.
3. Connect that red wire instead to a cigarette lighter socket. Also connect a ground wire to the socket so it now has both +12V and ground to be powered up.
4. Plug the USB power adaptor into this socket.
5. Use a USB cable with the "A" plug (standard USB plug) still in place, but cut off the other end (whatever it had; mini-USB or micro-USB or USB-C, whatever).
6. Use the VOM to determine which of the 2 or 4 wires in the USB cable has the +5V on it. Some USB cables have 4 wires if the supply both voltage and data. Others that are charger cables only just have 2 wires (+5V and ground).
7. Solder a ring lug on the wire with the +5V on it. Eliminate/insulate the other wire(s) in the USB cable.
8. Connect the ring lug to either end of the "strap" connector on the back of the gauges. This will supply the needed +5V for the gauges to work. The original +12V red wire from the fuse is no longer connected to the rear of the gauges. It is only connected to the power socket your USB charge adaptor is plugged into. Both the fuel and the temp gauges will run fine with this +5V supply attached to the "strap".

USB-mod.jpg
 
Thank you to both for the responses. Very helpful.

All the ohm readings during bench testing come out correct. Not the case when everything is installed.

Fuel gauge:
Ohms on bench testing installed in speedo housing. Ground is housing of speedo. These all appear to be low, but close. Thoughts?
S to gr = 67.0
S to I = 25.3
S to A = 25.3
I to A = 0.0
I to gr = 32.0
A to gr = 32.0

Below is a pic of the back of the old gauge and the new. When I connect the fuel gauge to the wiring harness, not chassis grounded, it goes to full immediately. Grounding the housing and it drops to E. Measuring pink wire to chassis ground gets 19ohms, then slowly drops...18, 17, etc. Not sure what that is all about. Not completely sure about fuel level in jeep, but I believe it to be full. Will fill it up for validation.

Fuel gauge dropping to E indicates a high resistance. Does this indicate a grounding issue?


Measuring the voltage at the A post, I get 12v. All specs say it should be 5v. Bad gauge or a change in design.

Temp Gauge:
I noticed fully installed and grounded, turning on the key the needle would move towards C. The ohms between post are correct. I have a variable power supply. Set it to 5v. Connected power to I post, touched ground to A post, needle moves a little in the wrong direction. Same as key on. Verify I have the post correct, I do. Move +wire to S post, gauge jumps to H immediately. Let go it returns. The post appear to be backwards in the gauge. I don't have an adjustable rheostat. Next step is to test it in the jeep grounding through temp gauge with warmed up engine. Will get back with those results. However, any Thoughts?
 

Attachments

  • comparison.jpg
    comparison.jpg
    204.8 KB · Views: 2
Some internet research indicates the temp gauge post are in fact backwards. I am also finding info indicating both gauges work on 12v and have internal regulators.
 
The gauges actually both run on +5V. The fuel gauge has the regulator inside it to drop the voltage from the +12V coming in on the red wire at terminal "I" to the needed +5V inside the fuel gauge and then across the strap between the two gauges on the "A" terminals over to the temp gauge. If you're getting the full +12V on the "A" terminal, then it seems the regulator inside the fuel gauge is not dropping the +12V down to the needed +5V. This would then cause the temp gauge, via the sending unit on the engine, to draw too much current. +12V across that resistance (the mechanism and the sending unit) would draw slightly over twice the current draw as +5V across the same resistance.

Agree based on your bench testing that your posts on the temp gauge seem backward. The +5V should be on the "A" terminal (where the strap is connected from the fuel gauge) and then the "S" terminal should go to the temp sending unit, or ground for your bench test, since the temp sending unit provides a variable resistance to ground based on engine temp. When the engine is cold, the sender unit would have over 75 ohms of resistance. When the engine is hot, the sender unit would lower the resistance to about 13 ohms. So with no sending unit and just grounding that "S" terminal on the bench, the gauge should peg to the hot or red area. Somewhere between 36 ohms (cool) and 13 ohms (warm) in the sending unit would cause the gauge to read in the normal range.

A test option is to hold set the gauge in the engine compartment with a clip lead (alligator clips) to connect the "S" terminal to the temp sending unit (unplug the existing purple wire from the sending unit), and then connect your variable +5V supply to the "A" terminal. Then you should read a cold engine. Use a hair dryer or heat gun to heat up the sending unit and watch the gauge move as it warms up.

But back to your issue of reading the full +12V at the "terminal" on the fuel gauge - that should be +5V and if not, troubleshoot that issue or use the USB mod I described previously (although admittedly that is a work-around rather than identify the root cause).

Of course the other option is a digital gauge cluster like Dakota Digital or Speedhut. I love my Dakota Digital gauge set. None of these issues.
 
Talked to Omix Ada tech support. The new gauges all work on 12v. The A post on fuel gauge will put out 12v to Temp gauge. My temp gauge started working now. The gauge shows almost H. However, the sending unit reads 31 ohms. Found some reviews on Amazon about the fuel and temp combo 17209.01. Guy indicates the post are reversed and points out there is an adjustment pot.
tempadjuster.jpg
Bit of silicon holding it in place came loose easily.
Turned it to this point. Check again and gauge now register at where I think it should.
tempadjusted.jpg
 
Here is my fix for the temp gauge post swap. Easy fix if you know it is the problem. After adjusting the gauge as above, it now runs near vertical when at operating temp. Pleased with this result. Now need to drop tank and replace sending unit. Avoiding this task...

tempwiring.jpg
 
Glad you found the issue. Interesting that the posts are swapped. You'd think they would put some note in with the gauge letting you know you have to swap the wires so as to prevent popping the fuse after installation. I have found over the years that after market CJ gauges are "finicky" like voltage variances, don't read accurately, etc. But I haven't experienced an issue where you had to re-wire stuff due to the connections being swapped or in different places. And the fact they eliminated the voltage regulator and just run the gauges at +12V is also interesting. What if you only swapped one gauge and not both as a pair? Fun times...
 
Here is my fix for the temp gauge post swap. Easy fix if you know it is the problem. After adjusting the gauge as above, it now runs near vertical when at operating temp. Pleased with this result. Now need to drop tank and replace sending unit. Avoiding this task...

View attachment 86165
A lot of guys have cut an access panel in the tub:


The odds of you having to replace the sender multiple times are high...the quality on them is about like it is on the repop gauges
 
A lot of guys have cut an access panel in the tub:


The odds of you having to replace the sender multiple times are high...the quality on them is about like it is on the repop gauges
Like this? :chug:

 
Here's a thread I posted about working on the sending unit and having an access panel in the floor, along with advice on using a brass float to replace the cheap and often leaky plastic ones.
Fuel Sending Unit
 

Jeep-CJ Donation Drive

Help support Jeep-CJ.com by making a donation.

Help support Jeep-CJ.com by making a donation.
Goal
$200.00
Earned
$10.00
This donation drive ends in
Back
Top Bottom
AdBlock Detected

I get it, I'm a Jeep owner and ad-block detectors kinda stink but ads are needed on this site. This is a CJ site, all the ads are set for autos (some times others get through.) I cannot make them just for Jeeps but I try.

Please allow ads as they help keep this site running by offsetting the costs of software and server fees.
Clicking on No Thanks will temporarily disable this message.
I've Disabled AdBlock    No Thanks