Flywheel ring gear and clutch replacement
Oldguyinajeep
Jeeper
- Posts
- 122
- Thanks
- 1
- Location
- Derby, KS
- Vehicle(s)
- '86 CJ-7 258ci 4spd Dana 30 and 44
Howell TBI Fuel inj, Headers, Dual batteries, Warn winch/air compressor, rear
disc brake conversion, Detroit locker (rear), Eaton E-locker (front), 4:10 gears, 2.5 in Rancho lift, 1" body lift, fully armored, 35" BFG KM2s, Warn front hub conversions, line locks front and rear, roll cage, warn front bumper, rock hard rear bumper/tire carrier, DUI ignition, dual electric fans, LED rock lights
This is sort of a “lessons learned” note about my flywheel ring gear replacement, intended to help anyone embarking on this project in the future. A chance for rookies to perhaps learn from my mistakes, and for experienced others to feel really superior, or smile and think to themselves, “been there”. General info about this project is found in my previous post, and all of the replies. Thanks to all who responded. I may be repeating some stuff, so bear with me.
First, the flywheel ring gear: it can be inspected by removing the metal plate from the bottom front of the bell housing, if yours has one. Alternatively, you can remove the starter and view the ring gear from there. The engine can be turned with a socket and breaker bar on the harmonic balance. The noise my jeep made while starting made me pretty sure what I would find, and it turned out to be the case: the teeth on the ring gear were all knarfed up. Replacement was necessary. As advised in this forum (Lumpy, I believe), it’s smart to replace the starter, as well. Might as well have new gears meshing with new gears. In my youth, I’d have just replaced the starter drive, but I’ve grown lazy and have more money now, so I just replaced the whole starter.
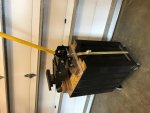
I am fortunate enough to have access to a lift, so didn’t have to do this lying on my back. The downside is, I don’t have a tall transmission jack, and couldn’t find a rental anywhere nearby. So, I made a hillbilly setup, involving a craftsman rollaway toolbox, some wood for reinforcement (and to bring it to the optimal height), and a floor jack. I welded together some scrap channel and a spare mm socket, and made a perch for the transmission (see pic). Tall transmission jacks can be purchased from Harbor Freight for under $200, but I thought this would be an interesting experiment. I use the safety chains from my towbar to wrap through the channel and around the trans/transfer case. A bolt and washers can be used to link the chain together at the desired length, and can be loosened when reassembling, when some slack may be needed. I removed the trans/TC as a unit, but separated them for reassembly. This is where I made my first mistake. I separated them directly behind the transmission, in front of the spacer/adapter. This meant I had to scrape off the old gasket and sealer, run to the jeep shop for a new gasket, and reassemble the parts. This was complicated by the fact that there were 3 thin shims between the output bearing and the case. My mechanic suggested that I hold the shims in place with Vaseline while reassembling the case, and this worked fairly well. At any rate, detach the TC behind the adapter, and avoid this mess.
Flywheel bolt removal was easy with impact tools, but would probably require a cheater bar if done with hand tools. Flywheel resurfacing cost about $40, and can be done with the ring gear on or off. The guy at the machine shop says they routinely knock the old gears off with a hammer and chisel when they are replacing them, but I heated mine with an oxyacetylene torch, and it dropped right off. Heating and installation of the new gear was very quick and easy, and there are lots of videos available to show how it’s done. Side note: When I replaced the ring gear on my differential last year, I put the diff in the freezer overnight, and the room temperature ring gear dropped right down into place. This doesn’t work with a flywheel. I tried it.
The next item of interest is the pilot bearing. There are many videos showing people using various substances (grease, bread, caulk, silicone sealer, etc.) to hydraulically remove the bearing. I kind of wanted to try the bread thing, just for grins, but resisted. O’Reilly Auto Parts rent 5 lb slide hammers with pilot bearing puller attachments, and this worked great.
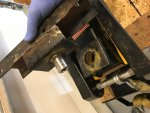
This brings us to the clutch set, which was supposed to include the pilot bearing. On the advice of the forum, I chose a Luk set. My mechanic also uses them, and so I was confident in the quality. The kit I got ( #01-007) include two bushings instead of a bearing, like what came out of my jeep. I suppose a bushing would be fine, but a bearing seems better, so I bought a new bearing to replace the old. The number is FC-65354 , and it cost $7-8. It goes inside a metal sleeve, which remained in the crankshaft after I pulled the bearing. When reinstalling the bearing, use green locktite between the bearing and sleeve. Either of the bushings can be used as a seater to tap the new bearing into place. It was just a little irritating to have to buy a bearing, otherwise the kit was fine. It comes with two alignment tools (for different sized input shafts). Also the throw out bearing that comes with this kit is very different in appearance than the one I took out. It’s a cast steel case with a larger contact surface area and a grease zerk. The dimensions from clutch to fork are identical, and thus should be fine. I read many reviews criticizing the bearings that come with the Luk kit, saying they were partially plastic. This one is definitely not, and may be Luk’s answer to that concern.
It would be a challenge to replace the trans/TC as a single unit, and I’m glad I chose to separate them. It takes some finesse to get the trans into place. I used the suggested trick of getting four 6” 7/16 bolts, cutting off the heads, and using them as guide dowels to get the trans in place. It worked well. Turning the output shaft will turn the input shaft to align with the clutch disc splines. Here’s something that was confusing to me because I really hadn’t thought about it beforehand: I was waiting for the output shaft to quit turning, as a sign that the input splines had entered the clutch disc. That doesn’t happen! The trans was in neutral, and the output shaft can turn even when the input shaft doesn’t. The indication of proper seating of the input shaft into the clutch disc, is when the trans moves forward in a substantial way. Eyeballing it, you can tell the shaft has to be inside the disc.
With the transmission in place, I began removing the dowels and replacing them with bolts, one at a time. Then the cluster f*** began. One of the bolts wouldn’t tighten. The hole was stripped. What I should have done: remove the trans to get a straight shot at drilling and tapping the hole for a helicoil, or better yet, remove the bell housing, and avoid having to try and carefully scavenge all the metal fragments involved in the process. What I did: Since the stripped hole was on the lower passenger side, I felt like I could drill a straight hole with the trans remaining in place. Maybe I’d have succeeded if I’d had a right angle drill with a short bit, but I didn’t and I didn’t. I tapped the hole, and it looked like it wasn’t entirely straight. Sure enough, it was angled just enough that the helicoil wouldn’t stay in place. So… down to the jeep shop I went to buy a used bell housing. This must be a common issue, because I looked at 5 or 6 bell housings before I found one that didn’t have at least one hole partially stripped. Two of the housings already had helicoils in a hole. This is crazy! I ran a tap through all the holes to clean them up, and bought new bolts as well. There was considerable anxiety as I tightened up the trans mounting bolts after reinstalling everything, waiting gingerly for the “click” of the torque wrench.
Before reinstalling the TC, I replaced the original strap and bolt style u-joint yokes with the stronger u-bolt type. I had previously done this on the differential end, but hadn’t yet done it on the TC. Everything else went back together without incident, and I’m back on the road. Again, thanks to all who responded to my questions.
First, the flywheel ring gear: it can be inspected by removing the metal plate from the bottom front of the bell housing, if yours has one. Alternatively, you can remove the starter and view the ring gear from there. The engine can be turned with a socket and breaker bar on the harmonic balance. The noise my jeep made while starting made me pretty sure what I would find, and it turned out to be the case: the teeth on the ring gear were all knarfed up. Replacement was necessary. As advised in this forum (Lumpy, I believe), it’s smart to replace the starter, as well. Might as well have new gears meshing with new gears. In my youth, I’d have just replaced the starter drive, but I’ve grown lazy and have more money now, so I just replaced the whole starter.
I am fortunate enough to have access to a lift, so didn’t have to do this lying on my back. The downside is, I don’t have a tall transmission jack, and couldn’t find a rental anywhere nearby. So, I made a hillbilly setup, involving a craftsman rollaway toolbox, some wood for reinforcement (and to bring it to the optimal height), and a floor jack. I welded together some scrap channel and a spare mm socket, and made a perch for the transmission (see pic). Tall transmission jacks can be purchased from Harbor Freight for under $200, but I thought this would be an interesting experiment. I use the safety chains from my towbar to wrap through the channel and around the trans/transfer case. A bolt and washers can be used to link the chain together at the desired length, and can be loosened when reassembling, when some slack may be needed. I removed the trans/TC as a unit, but separated them for reassembly. This is where I made my first mistake. I separated them directly behind the transmission, in front of the spacer/adapter. This meant I had to scrape off the old gasket and sealer, run to the jeep shop for a new gasket, and reassemble the parts. This was complicated by the fact that there were 3 thin shims between the output bearing and the case. My mechanic suggested that I hold the shims in place with Vaseline while reassembling the case, and this worked fairly well. At any rate, detach the TC behind the adapter, and avoid this mess.
Flywheel bolt removal was easy with impact tools, but would probably require a cheater bar if done with hand tools. Flywheel resurfacing cost about $40, and can be done with the ring gear on or off. The guy at the machine shop says they routinely knock the old gears off with a hammer and chisel when they are replacing them, but I heated mine with an oxyacetylene torch, and it dropped right off. Heating and installation of the new gear was very quick and easy, and there are lots of videos available to show how it’s done. Side note: When I replaced the ring gear on my differential last year, I put the diff in the freezer overnight, and the room temperature ring gear dropped right down into place. This doesn’t work with a flywheel. I tried it.
The next item of interest is the pilot bearing. There are many videos showing people using various substances (grease, bread, caulk, silicone sealer, etc.) to hydraulically remove the bearing. I kind of wanted to try the bread thing, just for grins, but resisted. O’Reilly Auto Parts rent 5 lb slide hammers with pilot bearing puller attachments, and this worked great.
This brings us to the clutch set, which was supposed to include the pilot bearing. On the advice of the forum, I chose a Luk set. My mechanic also uses them, and so I was confident in the quality. The kit I got ( #01-007) include two bushings instead of a bearing, like what came out of my jeep. I suppose a bushing would be fine, but a bearing seems better, so I bought a new bearing to replace the old. The number is FC-65354 , and it cost $7-8. It goes inside a metal sleeve, which remained in the crankshaft after I pulled the bearing. When reinstalling the bearing, use green locktite between the bearing and sleeve. Either of the bushings can be used as a seater to tap the new bearing into place. It was just a little irritating to have to buy a bearing, otherwise the kit was fine. It comes with two alignment tools (for different sized input shafts). Also the throw out bearing that comes with this kit is very different in appearance than the one I took out. It’s a cast steel case with a larger contact surface area and a grease zerk. The dimensions from clutch to fork are identical, and thus should be fine. I read many reviews criticizing the bearings that come with the Luk kit, saying they were partially plastic. This one is definitely not, and may be Luk’s answer to that concern.
It would be a challenge to replace the trans/TC as a single unit, and I’m glad I chose to separate them. It takes some finesse to get the trans into place. I used the suggested trick of getting four 6” 7/16 bolts, cutting off the heads, and using them as guide dowels to get the trans in place. It worked well. Turning the output shaft will turn the input shaft to align with the clutch disc splines. Here’s something that was confusing to me because I really hadn’t thought about it beforehand: I was waiting for the output shaft to quit turning, as a sign that the input splines had entered the clutch disc. That doesn’t happen! The trans was in neutral, and the output shaft can turn even when the input shaft doesn’t. The indication of proper seating of the input shaft into the clutch disc, is when the trans moves forward in a substantial way. Eyeballing it, you can tell the shaft has to be inside the disc.
With the transmission in place, I began removing the dowels and replacing them with bolts, one at a time. Then the cluster f*** began. One of the bolts wouldn’t tighten. The hole was stripped. What I should have done: remove the trans to get a straight shot at drilling and tapping the hole for a helicoil, or better yet, remove the bell housing, and avoid having to try and carefully scavenge all the metal fragments involved in the process. What I did: Since the stripped hole was on the lower passenger side, I felt like I could drill a straight hole with the trans remaining in place. Maybe I’d have succeeded if I’d had a right angle drill with a short bit, but I didn’t and I didn’t. I tapped the hole, and it looked like it wasn’t entirely straight. Sure enough, it was angled just enough that the helicoil wouldn’t stay in place. So… down to the jeep shop I went to buy a used bell housing. This must be a common issue, because I looked at 5 or 6 bell housings before I found one that didn’t have at least one hole partially stripped. Two of the housings already had helicoils in a hole. This is crazy! I ran a tap through all the holes to clean them up, and bought new bolts as well. There was considerable anxiety as I tightened up the trans mounting bolts after reinstalling everything, waiting gingerly for the “click” of the torque wrench.
Before reinstalling the TC, I replaced the original strap and bolt style u-joint yokes with the stronger u-bolt type. I had previously done this on the differential end, but hadn’t yet done it on the TC. Everything else went back together without incident, and I’m back on the road. Again, thanks to all who responded to my questions.