Build Thread 85 CJ7 Rebuild, Labor of Love

Build Thread 85 CJ7 Rebuild, Labor of Love

Ultrunner

Senior Jeeper
Posts
632
Thanks
21
Location
CT
Vehicle(s)
‘85 CJ7, SCB 350, AX15, D30, Upgraded AMC20, D300
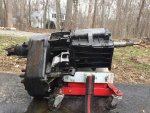
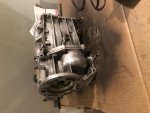
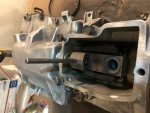
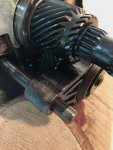
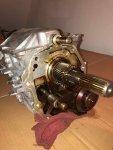
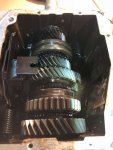
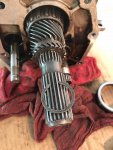
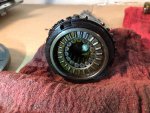
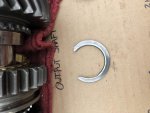
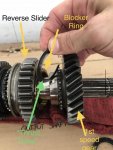
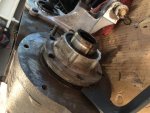
I have begun rebuilding my 1985 CJ7, I bought in 1998. It was the first vehicle I bought after I joined the Navy; i was constantly tinkering with it to keep it running. I have been kicking around the idea of rebuilding it for years and finally decided to just jump in with both feet. I started with the transmission rebuild. I am doing this long distance as the vehicle is still at my parent's house and I am 5 states away; therefore I am grabbing parts as I can, refurbishing them, and moving on.

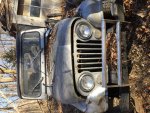
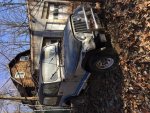
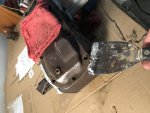
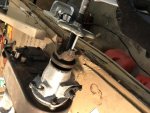
These are some photos of the old girl; she's in rough shape. The guy I bought it from rigged the turn signals to place "Love me Tender" by Elvis Presley.
 

Attachments

  • IMG_0806.jpg
    IMG_0806.jpg
    100.8 KB · Views: 172
  • IMG_0805.jpg
    IMG_0805.jpg
    101.1 KB · Views: 235
Nice! Good luck! I started a frame off resto of my '79 late last year (started a thread the other day). Been a blast so far, pricey too! Looking forward to seeing more of your progress.

I'm retired navy myself!
 
dang 5 states away is hard to do, good luck look forward to seeing you rebuild it
 
Thanks for all of the support guys. I began cleaning my T5, degreasing, scrubbing etc...

For anyone trying this, I strongly recommend using some kind of engine degreaser, soaking it really well and then scrubbing it down to get all of the surface grease. I hosed it off and used simple green. Once I didn't feel like applying the elbow grease, I used a soft wheel (they make ones that are plastic) to avoid pitting or really marring the aluminum and cleaned the case. It was a lot of work.

Before and after pics of the cleaning attached. After this part I used the T5 service manual from Borg Warner; someone awesome posted a copy of it in the documents section of this forum, there is also a revised Tremec version which has a little better drawings. Link: http://www.tremec.com/anexos/TRSM-T5-0510-R1_173.pdf
 

Attachments

  • IMG_0905.jpg
    IMG_0905.jpg
    98.9 KB · Views: 218
  • IMG_1024.jpg
    IMG_1024.jpg
    84 KB · Views: 206
Okay for some dumb reason all of my iPhone photos are posting sideways and for all of my training and education I cannot figure out how to embed photos in the post, only attach as thumbnails. Unless it's my browser, I am using safari.
 
I use my phone it’s been awhile since I have used the computer, maybe someone can chime in


Sent from my iPhone using Tapatalk
 
This post is more of a test to see if it is better for me to maintain updates with my phone.

Removed the shift rail assembly with a punch and hammer. Careful not to lose the ball and spring. I threw away the plastic shifter bushing since the rebuild kit has a new one.
 

Attachments

  • 49968D03-6F82-44BE-B1EF-9F15E763F0A4.jpg
    49968D03-6F82-44BE-B1EF-9F15E763F0A4.jpg
    19.9 KB · Views: 215
  • B30D3411-1B3F-490A-9B6D-73C6DA4B8AF2.jpg
    B30D3411-1B3F-490A-9B6D-73C6DA4B8AF2.jpg
    18.5 KB · Views: 175
Removed the adapter housing to access the output shaft and 5th gear assembly. The manuals recommend putting a block of wood under the fork when removing the pin, which I VERY MUCH recommend doing to avoid bending the 5th gear shift rail. I really had to beat on it to get the pin out.

This is what the case looks like with the adapter removed.

Once I removed the top cover, the output shaft holding the main gears looks pretty good.

I did not remove the shift lever as it was more work than necessary and looked good. It would have required me to heat the outer bolt and purchase a tamper proof torx head (TP50) and shock it with an impact to get it out. I simply replaced the retainer spring with the one that came in the rebuild kit.
 

Attachments

  • 5th_Shift_Fork.jpg
    5th_Shift_Fork.jpg
    101.4 KB · Views: 102
  • Output_5th.jpg
    Output_5th.jpg
    95.9 KB · Views: 100
  • Inside.jpg
    Inside.jpg
    88.2 KB · Views: 109
Drove the pin out of the 5th gear to remove this fork and gear assembly. Definitely needed to follow the recommendations to place a wood block under the fork to prevent bending the rod. This pin required quite a bit of force to drive through.

After this was out I was able to focus on the main output shaft; there was a lock ring that was very difficult to remove. I highly recommend anyone doing this spend the $15-$25 on a good pair of transmission lock ring pliers.

Finally, the clutch shaft came off. Pretty straight forward and as the image shows, the 15 needle bearings all came out with the shaft. All the parts in the clutch shaft: thrust bearing, washer, needle bearings, bearing cone, are all in the rebuild kit. Just needed to be careful to keep track of the shim the came out with this assembly. Shimming this assembly correctly on re-assembly will eliminate end-play.

One thing to note, the blocker ring was stuck onto the clutch shaft really well, I can to tap it a bit with a hammer to free it.
 

Attachments

  • Snap_ring.jpg
    Snap_ring.jpg
    92 KB · Views: 88
  • Clutch_Shaft.jpg
    Clutch_Shaft.jpg
    96.1 KB · Views: 92
  • 5th_Shift_Fork.jpg
    5th_Shift_Fork.jpg
    101.4 KB · Views: 95
I have run into a stand still with my T5 rebuild. I have also acquired a GMC small block 350 and figure the T5 will not be able to handle the power of the V8. I abandoning the T5 Rebuild and opting for an AX15. I have almost completely rebuilt the T5 and found a broken thrust washer that was only available in the '85-'86 CJs.

No one carries it, it's not part of any small parts kits, so I am selling what I have in the T5 (case, gears etc..). Hopefully someone will be able to put it to good use.

I will however, share my lessons from the rebuild.
 

Attachments

  • IMG_1629.jpg
    IMG_1629.jpg
    89.3 KB · Views: 51
  • IMG_1038.jpg
    IMG_1038.jpg
    90.9 KB · Views: 58
In my previous post I provided a few photos of the thrust race that snapped during the transmission re-assembly.

Since there are TONS of T5 rebuild videos out there I am going to spare the community the border of my experience and just focus on things I did that were not as common. Mostly, removal of the counter-shaft. Removal and re-installation was not nearly as hard as everything I read made it out to be.
 
I have run into a stand still with my T5 rebuild. I have also acquired a GMC small block 350 and figure the T5 will not be able to handle the power of the V8. I abandoning the T5 Rebuild and opting for an AX15. I have almost completely rebuilt the T5 and found a broken thrust washer that was only available in the '85-'86 CJs.

No one carries it, it's not part of any small parts kits, so I am selling what I have in the T5 (case, gears etc..). Hopefully someone will be able to put it to good use.

I will however, share my lessons from the rebuild.


Is having the thrust washer made at a machine shop out of the question?
 
You will like the ax15 if youre looking for a new one novak carries them brand new with every upgrade done to them. If i have problems with mine im going to buy one from them. $1500 and some change for a new one.
 
Is having the thrust washer made at a machine shop out of the question?

No it isn’t. I’m just not sure of the material. I don’t think it would be much, so for whomever takes it off of me I’m going to recommend that.
 
Update to the T5 build. Although I will not be using this transmission I was able to acquire the thrust washer I broke and will finish the rebuild in order to sell the T5. I'll put the money from the T5 into the purchase of my AX15.

Anyway, I got the part from J & W Jeep (J&W Jeep - J&W Auto Wreckers - New & Used Jeep Parts) I found the link on this site on another threat and took a shot in the dark. It worked. they were great, responded quickly and got me the part.
 
Dana 300 Rebuild (Disassembly):

I did a lot of research prior to this rebuild. There seems to be a few schools of thought on how best to approach beginning the disassembly of the Dana 300. My rebuild kit came with rebuild instructions, but I also downloaded (for free) a rebuild guide which included an exploded view diagram with labels from Autozone. Between the two I had very clear instructions. This thing was pretty beat up; it's about 30 years old and had lots of abuse and then sat for about a decade.

I've written a blog article about this rebuild, but the major lessons here are it's possible to disassemble the Dana 300 without a press and special tools, but not preferred. The Front Bearing support has pry points, but with all the covers and caps it was more important to work a putty knife into the seal and gradually work it free o avoid damaging anything.

On the disassembly, I used the guides I mentioned and laid out a big piece of cardboard I labeled "FRONT", "INTERMEDIATE", and "REAR" to keep parts organized and aid in reassembly.

Most of the big lessons came with re-assembly.
 

Attachments

  • IMG_0916.jpg
    IMG_0916.jpg
    96.9 KB · Views: 65
  • IMG_1232.jpg
    IMG_1232.jpg
    91.9 KB · Views: 67
  • IMG_1230.jpg
    IMG_1230.jpg
    92.5 KB · Views: 79
  • IMG_1239.jpg
    IMG_1239.jpg
    91.6 KB · Views: 61
I finished my transfer case rebuild. I’ll discuss lessons but, here is a photo of the finished product.

2489d54646dae9b83e0841e8c084080a.jpgb5451a524b9a88a52a3009b29f44a1b5.jpg


Sent from my iPhone using Tapatalk
 
Every cool good looking clean transfer case


Sent from my iPhone using Tapatalk
 
I hope it works as good as it looks.
 
I hope it works as good as it looks.


I hope so too. I didn’t do anything fancy with upgrades. Just a straight forward rebuild, so she should be good to go.


Sent from my iPhone using Tapatalk
 

Jeep-CJ Donation Drive

Help support Jeep-CJ.com by making a donation.

Help support Jeep-CJ.com by making a donation.
Goal
$200.00
Earned
$10.00
This donation drive ends in
Back
Top Bottom