| Parts List
: |
|
258 Short block 1980 or later 1980's
model preferred with 1/2" headbolts |
|
4.0L Cylinder Head casting #7120 or
#0630 |
|
4.0L Head Gasket (Fel Pro #9076PT) |
|
4.0L Valve Cover (Ebay) |
|
4.0L Valve Cover Gasket (Fel Pro #VS50022C) |
|
4.0L manifold or header (I used a
Borla Header for 91-92 Wrangler 6cyl) |
|
4.0L head bolts (1/2") |
|
4.0L Pushrods |
|
Crane hydraulic camshaft (#753901) |
|
Crane hydraulic lifters (#99278-12) |
|
ARP Rod bolts (#ARP-112-6001) |
|
Omix-Ada flywheel (#16912.05) |
|
Cloyes True Roller Timing chain and
gear set (#CLO-9-3127) |
|
Melling High Volume Oil pump kit
(#M-81AHV-S3) |
|
New belts and hoses |
|
Spark plugs and new wires |
|
Cast Piston set |
|
Timing Cover Gasket w/ Seal (Fel Pro
#TCS45117) |
|
|
|
INTRODUCTION:
My 1984 Jeep CJ 258 motor has over
200,000 miles on it. It leaks oil from the rear main seal,
distributor o-ring gasket, and oil pan. It needs an oil-ring job
and new valve seals and burns a quart every 400 miles. Toss in a
stuck lifter and a slapping timing chain, and you get the point.
The engine is simply tired.
|
|
To compound issues, my clutch
throw-out bearing is so worn that you can hear it churning when
you engage the clutch. I off-road this jeep a lot, so this write
up is going to focus on 2 huge sore-spots for me and this jeep.
The engine will be rebuilt and the clutch will be replaced at the
same time. Now I'll warn you ahead of time. I don't buy garbage
and I believe you get what you pay for. Jeepers are traditionally
cheapskates. This mod will put a large dent in the wallet because
we're going with a LUK Clutch, a complete rebuild of the 258 short
block assembly, and a completely overhauled 4.0L cylinder head.
A standard 258 produces roughly 115
hp. By adding the 4.0L head and exhaust header, we can increase
that by 40 hp and 10 hp respectively. Other performance options
will be evaluated during the rebuild phase. These will include a
high-volume oil pump, a hotter camshaft, hydraulic lifters, and a
4.0L exhaust header. I already run a Howell TBI Fuel Injection
system, so they should all compliment each other well.
If I go into too much detail and
specify things that are blatantly obvious, just realize that I've
never done anything like this before and I want to make your life
easier by explaining literally everything I can for you.
Make sure you bag and tag small
parts so you're not wasting time during the assembly process.
Do yourself another favor and
purchase an engine gasket kit....It will save you trips to the
parts store.
A complete list of all the tools I
used in this rebuild can be found at the bottom of this write-up. |
|
|
| The first
thing I did was purchase a rebuild 4.0L High Output cylinder head from
HESCO. They recondition the head, plug the water-jacket holes for you
and re-deck the head. You can use either 4.0L heads with casting #
7120 or 0630. In my case, it's from a 1996 Jeep Grand Cherokee
(#0630). Hesco also machined a hole in the head for the CJ
temperature sending unit. |
 |
|
I was also was lucky to get a 1988 AMC
258 short block from a friend to rebuild. |
|
 |
|
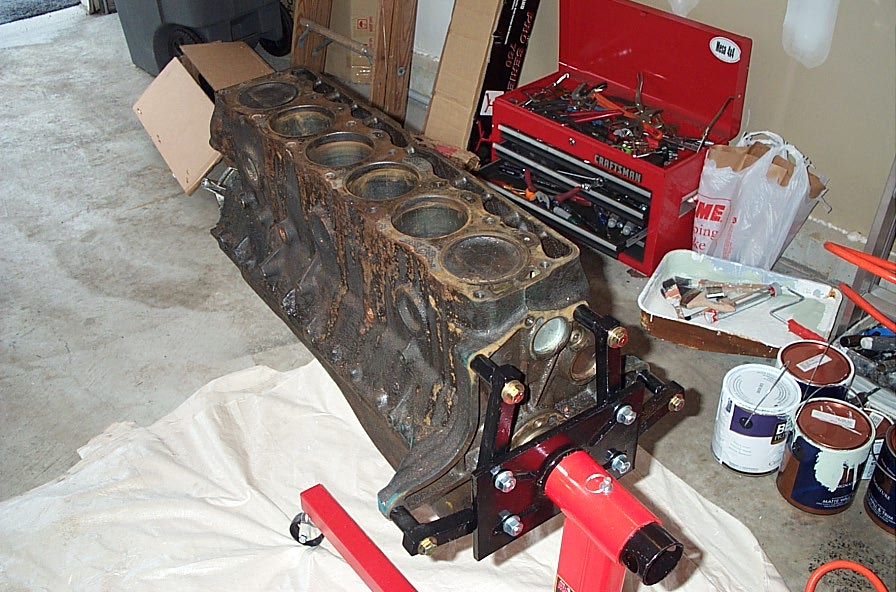
The short block is now on the engine
stand. Basically you use the bell housing holes. The top 3 are
3/8x16x3.5" and the bottom, outside two are 7/16x16x3.5". I used
all grade 8 hardware and used a few washers to get the proper
tightness and fit. I got the engine stand at PepBoys and put a
drop cloth under the whole thing to catch any fluids. |
|
 |
| First step
is to remove the fan, hoses, vibration dampener, timing chain cover
and the oil pan. After that, remove the oil pump assembly. |
|
|
In the first picture in this section
I'm showing you how I used the numbered stamp to etch the cylinder
# on each piston connecting rod and main bearing cap. You do this
so you know the exact placement and order of each one. After
that, loosen the two small nuts holding the rod and cap
together. Lightly tap the exposed studs until they sink down
flush with the cap. You can now wiggle the cap off as shown in
the second picture. |
|
 |
 |
| I went to
Lowes and got 3/8th clear tubing. Place this on the rod studs so when
the piston is being pushed out of the block so the threads on the
studs don't score the crankshaft. Put a piece of wood up against the
bottom side of the piston and strike it with a rubber mallet to push
the piston out of the block. The piston will fall out on the floor,
as will the cap bearings. Place the rod cap back on the rod and
secure with the two nuts. These are going to the machine shop with
the block. Repeat this procedure for the other 5 pistons. |
|
|
Remove the timing chain and crankshaft
gear. Just remove the large bolt and washer off the larger crank
gear and the oil slinger off of the cam gear and then tap the
large gear with a rubber mallet to loosen it up and it should
wiggle off. |
|
 |
|
The crankshaft is held in place by 6
main bearing caps. These caps must go back on in the same
position and order they are taken off. Luckily, the 258 (or at
least this one) had the main caps already cast with the position
and the number already on them. If yours don't, take the number
stamp set and stamp 1 through 6 on both the cap and the block so
the machine shop can tell how they go back on. |
|
 |
|
With the caps off, you can remove the
thin bearing shelves that lay under each cap. Now you should see
exactly the same thing as in the picture to the right. In this
write-up, the fuel pump was already removed. To get the
crankshaft out, remove your fuel pump and fuel pump shaft. |
|
 |
| Grab both
ends of the crank shaft and pull it straight up and out of the block.
It should give very little resistance. Pull out the bottom part of
the bearing shelves. Note, #3 and #6 will require you to tap them
out a little bit and then you can pull them out as shown in the second
picture. The third picture on the right shows the removal of the
rear main seal. |
|
| Remove the
oil pump retainer, check valve and spring. |
|
|
The last part of the process is to
remove the camshaft. All you need to do is pull it out from the
front of the block gently. You may have to twist it slightly to
guide it out, but be careful not to score it on the way out. Box
up you crankshaft, camshaft, pistons and rods and main bearing
caps. Take all that stuff, the cylinder head and the empty block
and we're off to the machine shop!!!! |
|
 |